


Monthly Archives: July 2012
C++ || Snippet – Custom Template Linked List Sample Code
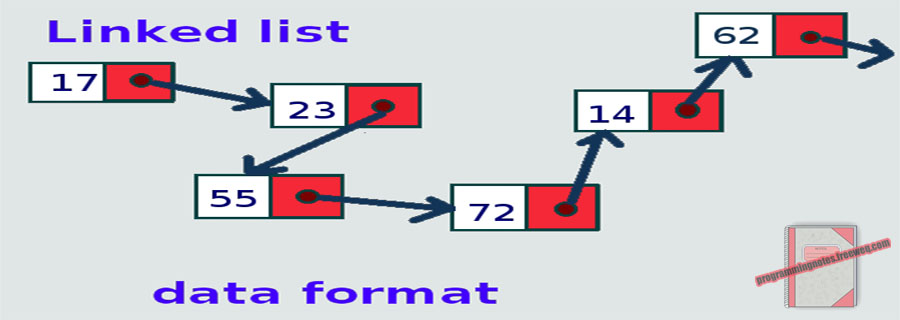
This page will consist of sample code for a singly linked list, which is loosely based on the built in C++ “List” library. Provided in the linked list class are the following functions:
|
1 2 3 4 5 6 7 8 9 10 11 12 13 14 15 16 17 18 19 20 21 22 23 24 25 26 27 28 29 30 |
* PushFront - Adds new item to the front of the list (LIFO) * PushBack - Adds new item to the back of the list (FIFO) * PopFront - Returns & removes first item from the list * PopBack - Returns & removes last item from the list * Front - Returns (but does not delete) the first item from the list * Back - Returns (but does not delete) the last item from the list * Delete - Searches and deletes the requested item * Display - Display all the current contents in the list * Replace - Replaces existing item from the list with a new item If existing item cannot be found, the new item is added to the back of the list * InsertBefore - Inserts new item before the existing item. If existing item cannot be found, the new item is added to the back of the list * InsertAfter - Inserts new item after the existing item. If existing item cannot be found, the new item is added to the back of the list * InsertInOrder - Inserts new item in numerical order, from lowest to highest * Size - Return the current size of the list * MakeEmpty - Initializes the list to an empty state |
From the following, the functions of interest to look out for are the “Delete, Display, Replace, InsertBefore, InsertAfter, and InsertInOrder” functions as they are typically used as programming assignments in many C++ Data structures courses to further demonstrate how linked lists operate.
|
1 2 3 4 5 6 7 8 9 10 11 12 13 14 15 16 17 18 19 20 21 22 23 24 25 26 27 28 29 30 31 32 33 34 35 36 37 38 39 40 41 42 43 44 45 46 47 48 49 50 51 52 53 54 55 56 57 58 59 60 61 62 63 64 65 66 67 68 69 70 71 72 73 74 75 76 77 78 79 80 81 82 83 84 85 86 87 88 89 90 91 92 93 94 95 96 97 98 99 100 101 102 103 104 105 106 107 108 109 110 111 112 113 114 115 116 117 118 119 120 121 122 123 124 125 126 127 128 129 130 131 132 133 134 135 136 137 138 139 140 141 142 143 144 145 146 147 148 149 150 151 152 153 154 155 156 157 158 159 160 161 162 163 164 165 166 167 168 169 170 171 172 173 174 175 176 177 178 179 180 181 182 183 184 185 186 187 188 189 190 191 192 193 194 195 196 197 198 199 200 201 202 203 204 205 206 207 208 209 210 211 212 213 214 215 216 217 218 219 220 221 222 223 224 225 226 227 228 229 230 231 232 233 234 235 236 237 238 239 240 241 242 243 244 245 246 247 248 249 250 251 252 253 254 255 256 257 258 259 260 261 262 263 264 265 266 267 268 269 270 271 272 273 274 275 276 277 278 279 280 281 282 283 284 285 286 287 288 289 290 291 292 293 294 295 296 297 298 299 300 301 302 303 304 305 306 307 308 309 310 311 312 313 314 315 316 317 318 319 320 321 322 323 324 325 326 327 328 329 330 331 332 333 334 335 336 337 338 339 340 341 342 343 344 345 346 347 348 349 350 351 352 353 354 355 356 357 358 359 360 361 362 363 364 365 366 367 368 369 370 371 372 373 374 375 376 377 378 379 380 381 382 383 384 385 386 387 388 389 390 391 392 393 394 395 396 397 398 399 400 401 402 403 404 405 406 407 408 409 410 411 412 413 414 415 416 417 418 419 420 421 422 423 424 425 426 427 428 429 430 431 432 433 434 435 436 437 438 439 440 441 442 443 444 445 446 447 448 449 450 451 452 |
// ============================================================================ // Author: Kenneth Perkins // Date: Jul 26, 2012 // Taken From: http://programmingnotes.org/ // File: LinkedList.h // Description: This is a class which implements various functions which // demonstrates the use of a Linked List. // ============================================================================ #include <iostream> template <class ItemType> class LinkedList { public: LinkedList(); /* Function: Constructor initializes list Precondition: None Postcondition: Defines private variables */ bool IsEmpty(); /* Function: Determines whether queue is empty Precondition: List has been created Postcondition: The function = true if the list is empty and the function = false if list is not empty */ void PushFront(ItemType item); /* Function: Adds new item to the front of the list (LIFO) Precondition: List has been created and is not full Postcondition: Item is in the list */ void PushBack(ItemType item); /* Function: Adds new item to the back of the list (FIFO) Precondition: List has been created and is not full Postcondition: Item is in the list */ ItemType PopFront(); /* Function: Returns & removes first item from the last Precondition: List has been initialized Postcondition: The first item in the list is removed */ ItemType PopBack(); /* Function: Returns & removes last item from the list Precondition: List has been initialized Postcondition: The last item in the list is removed */ ItemType Front(); /* Function: Returns (but does not delete) the first item from the list Precondition: List has been initialized Postcondition: The first item in the list is removed */ ItemType Back(); /* Function: Returns (but does not delete) the last item from the list Precondition: List has been initialized Postcondition: The last item in the list is removed */ void Delete(ItemType item); /* Function: Searches and deletes the requested item Precondition: List has been created and is not empty Postcondition: Item removed from the list */ void Display(); /* Function: Display all the current contents in the list Precondition: List has been created and is not empty Postcondition: List is displayed to the screen */ void Replace(ItemType initial, ItemType replace); /* Function: Replaces existing item from the list with a new item Precondition: List has been created and is not empty Postcondition: Initial item is replaced with the new one */ void InsertBefore(ItemType initial, ItemType newItem); /* Function: Inserts new item before the existing item Precondition: List has been created and is not empty Postcondition: New item is inserted before the existing item */ void InsertAfter(ItemType initial, ItemType newItem); /* Function: Inserts new item after the existing item Precondition: List has been created and is not empty Postcondition: New item is inserted after the existing item */ void InsertInOrder(ItemType item); /* Function: Inserts new item in numerical order, from lowest to highest Precondition: List has been created and is not empty Postcondition: The list is sorted in numerical order */ int Size(); /* Function: Return the current size of the list Precondition: List has been initialized Postcondition: The size of the list is returned */ void MakeEmpty(); /* Function: Initializes the list to an empty state Precondition: List has been created Postcondition: List no longer exists */ ~LinkedList(); /* Function: Deletes all the items in the list Precondition: List has been declared Postcondition: List no longer exists */ private: struct node { ItemType info; node* next; }; node* head; int size; }; //========================= Implementation ================================// template <class ItemType> LinkedList<ItemType>::LinkedList() { head = NULL; size = 0; }// end of LinkedList template <class ItemType> bool LinkedList<ItemType>::IsEmpty() { return (head==NULL); }// end of IsEmpty template <class ItemType> void LinkedList<ItemType>::PushFront(ItemType item) { // LIFO node* temp = new node; temp-> info = item; temp-> next = head; head = temp; ++size; }// end of PushFront template <class ItemType> void LinkedList<ItemType>::PushBack(ItemType item) { // FIFO node* temp = new node; temp->info = item; temp->next = NULL; if(IsEmpty()) { head=temp; } else { node* temp2 = head; while(temp2->next!=NULL) { temp2=temp2->next; } temp2->next=temp; } ++size; }// end of PushBack template <class ItemType> ItemType LinkedList<ItemType>::PopFront() { if(IsEmpty()) { std::cout<<"\nLIST EMPTY\n"; } else { ItemType item = head-> info; node* temp = head; head = head-> next; delete temp; --size; return item; } }// end of PopFront template <class ItemType> ItemType LinkedList<ItemType>::PopBack() { if(IsEmpty()) { std::cout<<"\nLIST EMPTY\n"; } else if(size == 1) { ItemType item = PopFront(); return item; } else { node* temp = head; ItemType item; while(temp->next != NULL) { if(temp->next->next==NULL) { node* temp2=temp->next; temp->next=temp->next->next; item = temp2-> info; delete temp2; break; } temp=temp->next; } --size; return item; } }// end of PopBack template <class ItemType> ItemType LinkedList<ItemType>::Front() { if(IsEmpty()) { std::cout<<"\nLIST EMPTY\n"; } else { return head-> info; } }// end of Front template <class ItemType> ItemType LinkedList<ItemType>::Back() { if(IsEmpty()) { std::cout<<"\nLIST EMPTY\n"; } else { node* temp = head; while(temp->next != NULL) { temp = temp-> next; } ItemType item = temp-> info; return item; } }// end of Back template <class ItemType> void LinkedList<ItemType>::Delete(ItemType item) { node* temp=head; if(IsEmpty()) { return; } else if(temp->info==item) { head=head->next; delete temp; --size; } else { while(temp->next!=NULL) { if(temp->next->info==item) { node* temp2=temp->next; temp->next=temp->next->next; delete temp2; --size; break; } temp=temp->next; } } }// end of Delete template <class ItemType> void LinkedList<ItemType>::Display() { node* temp=head; while(temp!=NULL) { std::cout<<temp->info<<std::endl; temp=temp->next; } }// end of Display template <class ItemType> void LinkedList<ItemType>::Replace(ItemType initial, ItemType replace) { node* temp=head; if(IsEmpty()) { PushFront(replace); } else if(temp->info==initial) { temp->info=replace; } else { while(temp->next!=NULL) { if(temp->info==initial) { temp->info=replace; break; } temp=temp->next; } if(temp->next==NULL) { PushBack(replace); } } }// end of Replace template <class ItemType> void LinkedList<ItemType>::InsertBefore(ItemType initial, ItemType newItem) { node* temp=head; node* temp2=new node; temp2->info=initial; temp2->next=NULL; if(IsEmpty()) { PushFront(newItem); } else if(temp->info==initial) { temp->info=newItem; temp2->next=temp->next; temp->next=temp2; ++size; } else { while(temp->next!=NULL) { if(temp->info==initial) { temp->info=newItem; temp2->next=temp->next; temp->next=temp2; ++size; break; } temp=temp->next; } if(temp->next==NULL) { PushBack(newItem); } } }// end of InsertBefore template <class ItemType> void LinkedList<ItemType>::InsertAfter(ItemType initial, ItemType newItem) { node* temp=head; node* temp2=new node; temp2->info=newItem; temp2->next=NULL; if(IsEmpty()) { PushFront(newItem); } else if(temp->info==initial) { temp2->next=temp->next; temp->next=temp2; ++size; } else { while(temp->next!=NULL) { if(temp->info==initial) { temp2->next=temp->next; temp->next=temp2; ++size; break; } temp=temp->next; } if(temp->next==NULL) { PushBack(newItem); } } }// end of InsertAfter template <class ItemType> void LinkedList<ItemType>::InsertInOrder(ItemType item) { if(IsEmpty()) { PushFront(item); } else { node* temp=head; node* temp2=new node; if(item <=(temp->info)) { ItemType placeHolder=temp->info; temp2->info=placeHolder; temp->info=item; temp2->next=temp->next; temp->next=temp2; ++size; } else { while(temp->next!=NULL) { if(((temp->info) <= item) && (item <= (temp->next->info))) { temp2->info=item; temp2->next=temp->next; temp->next=temp2; ++size; return; } temp=temp->next; } if(temp->next==NULL) { PushBack(item); } } } }// end of InsertInOrder template <class ItemType> int LinkedList<ItemType>::Size() { if(IsEmpty()) { std::cout<<"\nLIST EMPTY\n"; } return size; }// end of Size template <class ItemType> void LinkedList<ItemType>::MakeEmpty() { if(!IsEmpty()) { std::cout << "\nDestroying nodes...\n"; while(!IsEmpty()) { node* temp = head; //std::cout << temp-> info << '\n'; head = head-> next; delete temp; } size = 0; } }// end of MakeEmpty template <class ItemType> LinkedList<ItemType>::~LinkedList() { MakeEmpty(); }// http://programmingnotes.org/ |
===== DEMONSTRATION HOW TO USE =====
Use of the above template class is the same as its STL counterpart. Here is a sample program demonstrating its use.
|
1 2 3 4 5 6 7 8 9 10 11 12 13 14 15 16 17 18 19 20 21 22 23 24 25 26 27 28 29 30 31 32 33 34 35 36 37 38 39 40 41 42 43 44 45 46 47 48 49 50 51 52 53 54 55 56 57 58 59 |
#include <iostream> #include <string> #include "LinkedList.h" using namespace std; int main() { // declare variables, using a string as // the item type for the class. // NOTE: you can also use an int, float, double etc. // instead of a string LinkedList<string> list; // demontrate the "InOrder" function cout<<"** These are names of fruits sorted in order" <<" using the 'InsertInOrder()' function:\n\n"; list.InsertInOrder("Tomato"); list.InsertInOrder("Orange"); list.InsertInOrder("Apple"); list.InsertInOrder("Plum"); list.Display(); cout<<"\nThere is currently "<<list.Size()<<" items in the list\n\n"; // demonstrate the "Delete" function cout<<"\n** Here is the same list with the word 'Plum' deleted" << "\nusing the 'Delete()' function:\n\n"; list.Delete("Plum"); list.Display(); cout<<"\nThere is currently "<<list.Size()<<" items in the listnn"; // demonstrate the "InsertAfter" function cout<<"\n** Now the word 'Bike' will be added to the list," <<"\nright after the word 'Apple' using the " <<"'InsertAfter()' function:\n\n"; list.InsertAfter("Apple","Bike"); list.Display(); cout<<"\nThere is currently "<<list.Size()<<" items in the list\n\n"; // demonstrate the "InsertBefore" function cout<<"\n** Now the name 'Jessica' will be added to the list," <<"\nright before the word 'Orange' using the " <<"'InsertBefore()' function:\n\n"; list.InsertBefore("Orange","Jessica"); list.Display(); cout<<"\nThere is currently "<<list.Size()<<" items in the list\n\n"; // demonstrate the "Replace" function cout<<"\n** The word 'Orange' will now be replaced with the name," <<"\n'Kat' using the 'Replace()' function:\n\n"; list.Replace("Orange","Kat"); list.Display(); cout<<"\nThere is currently "<<list.Size()<<" items in the list\n\n"; }// http://programmingnotes.org/ |
Once compiled, you should get this as your output
** These are names of fruits sorted in order using the 'InsertInOrder()' function:Apple
Orange
Plum
TomatoThere is currently 4 items in the list
** Here is the same list with the word 'Plum' deleted
using the 'Delete()' function:Apple
Orange
TomatoThere is currently 3 items in the list
** Now the word 'Bike' will be added to the list,
right after the word 'Apple' using the 'InsertAfter()' function:Apple
Bike
Orange
TomatoThere is currently 4 items in the list
** Now the name 'Jessica' will be added to the list,
right before the word 'Orange' using the 'InsertBefore()' function:Apple
Bike
Jessica
Orange
TomatoThere is currently 5 items in the list
** The word 'Orange' will now be replaced with the name,
'Kat' using the 'Replace()' function:Apple
Bike
Jessica
Kat
TomatoThere is currently 5 items in the list
C++ || Snippet – How To Swap Two Numbers Without Using A Third “Temporary” Variable

The following are three programs which demonstrates how to swap two numbers without using a third “temporary” variable.
Why would anyone want to swap two numbers without utilizing a third variable? There is no real reason to do so other than the fact that exercises such as these are typically used as programming assignments/interview questions. This is a technique that’s rarely ever practical in a real world setting, but it is still an interesting task nonetheless.
|
1 2 3 4 5 6 7 8 9 10 11 12 13 14 15 16 17 18 19 20 21 22 23 24 25 26 27 28 |
#include <iostream> using namespace std; int main() { // declare variables int x = 0; int y = 0; // get data cout <<"Please enter two numbers: "; cin >> x >> y; cout <<"nItem #1 = "<<x<<endl; cout <<"Item #2 = "<<y<<endl; cout <<"nSwitching the numbers..n"; // switch the numbers using simple math x = x+y; y = x-y; x = x-y; cout <<"nItem #1 = "<<x<<endl; cout <<"Item #2 = "<<y<<endl; return 0; }// http://programmingnotes.org/ |
SAMPLE OUTPUT:
Please enter two numbers: 7 28Item #1 = 7
Item #2 = 28Switching the numbers..
Item #1 = 28
Item #2 = 7
|
1 2 3 4 5 6 7 8 9 10 11 12 13 14 15 16 17 18 19 20 21 22 23 24 25 26 27 28 |
#include <iostream> using namespace std; int main() { // declare variables int x = 0; int y = 0; // get data cout <<"Please enter two numbers: "; cin >> x >> y; cout <<"nItem #1 = "<<x<<endl; cout <<"Item #2 = "<<y<<endl; cout <<"nSwitching the numbers..n"; // switch the numbers using the xor swap algorithm x ^= y; y ^= x; x ^= y; cout <<"nItem #1 = "<<x<<endl; cout <<"Item #2 = "<<y<<endl; return 0; }// http://programmingnotes.org/ |
SAMPLE OUTPUT:
Please enter two numbers: 5 12453Item #1 = 5
Item #2 = 12453Switching the numbers..
Item #1 = 12453
Item #2 = 5
|
1 2 3 4 5 6 7 8 9 10 11 12 13 14 15 16 17 18 19 20 21 22 23 24 25 26 27 |
#include <iostream> #include <algorithm> using namespace std; int main() { // declare variables int x = 0; int y = 0; // get data cout <<"Please enter two numbers: "; cin >> x >> y; cout <<"nItem #1 = "<<x<<endl; cout <<"Item #2 = "<<y<<endl; cout <<"nSwitching the numbers..n"; // switch the numbers using the in-built swap function swap(x, y); cout <<"nItem #1 = "<<x<<endl; cout <<"Item #2 = "<<y<<endl; return 0; }// http://programmingnotes.org/ |
SAMPLE OUTPUT:
Please enter two numbers: 2132 6547546Item #1 = 2132
Item #2 = 6547546Switching the numbers..
Item #1 = 6547546
Item #2 = 2132
C++ || Snippet – Palindrome Checker Using A Stack & Queue

This page consists of a sample program which demonstrates how to use a stack and a queue to test for a palindrome. This program is great practice for understanding how the two data structures work.
REQUIRED KNOWLEDGE FOR THIS PROGRAM
Structs

Classes

Template Classes - What Are They?

Stacks

Queues

LIFO - Last In First Out

FIFO - First In First Out

#include 'SingleQueue.h'

#include 'ClassStackListType.h'
This program first asks the user to enter in text which they wish to compare for similarity. The data is then saved into the system using the “enqueue” and “push” functions available within the queue and stack classes. After the data is obtained, a while loop is used to iterate through both classes, checking to see if the characters at each location within both classes are the same. If the text within both classes are the same, it is a palindrome.
NOTE: This program uses two custom template.h classes. To obtain the code for both class, click here and here.
|
1 2 3 4 5 6 7 8 9 10 11 12 13 14 15 16 17 18 19 20 21 22 23 24 25 26 27 28 29 30 31 32 33 34 35 36 37 38 39 40 41 42 43 44 45 46 47 48 49 50 51 52 53 54 55 56 57 58 59 |
// ============================================================================ // Author: Kenneth Perkins // Date: Jul 22, 2012 // Taken From: http://programmingnotes.org/ // File: palindrome.cpp // Description: Demonstrates a palindrome checker using a stack & queue // ============================================================================ #include <iostream> #include <cctype> #include "SingleQueue.h" #include "ClassStackListType.h" using namespace std; int main() { // declare variable char singleChar = ' '; bool isPalindrome = true; SingleQueue<char> queue; StackListType<char> stack; // get data from user, then place them into the // queue and stack for storage. This loop also // displays the user input back to the screen via cout cout <<"Enter in some text to see if its a palindrome: "; while(cin.get(singleChar) && singleChar != '\n') { cout<<singleChar; queue.EnQueue(toupper(singleChar)); stack.Push(toupper(singleChar)); } // determine if the string is a palindrome while((!queue.IsEmpty() && !stack.IsEmpty()) && isPalindrome) { if(queue.Front() != stack.Top()) { isPalindrome = false; } else { queue.DeQueue(); stack.Pop(); } } // display results to the screen if(isPalindrome) { cout<<" is a palindrome!\n"; } else { cout<<" is NOT a palindrome..\n"; } return 0; }// http://programmingnotes.org/ |
QUICK NOTES:
The highlighted lines are sections of interest to look out for.
The code is heavily commented, so no further insight is necessary. If you have any questions, feel free to leave a comment below.
Once compiled, you should get this as your output
(Note: The code was compiled 2 separate times to demonstrate different output)
====== RUN 1 ======Enter in some text to see if its a palindrome: StEP on No pETS
StEP on No pETS is a palindrome!
====== RUN 2 ======
Enter in some text to see if its a palindrome: Hello World
Hello World is NOT a palindrome..
C++ || Convert Numbers To Words Using A Switch Statement

This program demonstrates more practice using arrays and switch statements.
REQUIRED KNOWLEDGE FOR THIS PROGRAM
Integer Arrays

Cin.get

Isdigit

For loops

While Loops

Switch Statements - How To Use
Using “cin.get(),” this program first asks the user to enter in a number (one at a time) that they wish to translate into words. If the text which was entered into the system is a number, the program will save the user input into an integer array. If the text is not a number, the input is discarded. After integer data is obtained, a for loop is used to traverse the integer array, passing the data to a switch statement, which translates the number to text.
This program is very simple, so it does not have the ability to display any number prefixes. As a result, if the number “1858” was entered into the system, the program would output the converted text: “One Eight Five Eight.”
|
1 2 3 4 5 6 7 8 9 10 11 12 13 14 15 16 17 18 19 20 21 22 23 24 25 26 27 28 29 30 31 32 33 34 35 36 37 38 39 40 41 42 43 44 45 46 47 48 49 50 51 52 53 54 55 56 57 58 59 60 61 62 63 64 65 66 67 68 69 70 71 72 73 74 |
#include <iostream> #include <cctype> using namespace std; int main() { // declare variables int numberArry[50]; int numElems=0; char singleNum=' '; // ask the user for a number cout<<"Enter number: "; // get data from the user, one character at a time while(cin.get(singleNum) && singleNum != 'n') { // only numbers will be saved into the array, everything // else is ignored if(isdigit(singleNum)) { // this converts a char into an integer using ascii values numberArry[numElems] = (singleNum)-'0'; ++numElems; } } cout<<endl; // using the data from the array, display the // numbers to the screen using a switch statement for(int index=0; index < numElems; ++index) { switch(numberArry[index]) { case 0 : cout<<"Zero "; break; case 1 : cout<<"One "; break; case 2: cout<<"Two "; break; case 3: cout<<"Three "; break; case 4: cout<<"Four "; break; case 5: cout<<"Five "; break; case 6: cout<<"Six "; break; case 7: cout<<"Seven "; break; case 8: cout<<"Eight "; break; case 9: cout<<"Nine "; break; default: cout<<"nERROR!n"; break; } } cout<<endl; return 0; }// http://programmingnotes.org/ |
QUICK NOTES:
The highlighted lines are sections of interest to look out for.
The code is heavily commented, so no further insight is necessary. If you have any questions, feel free to leave a comment below.
Once compiled, you should get this as your output
Note: The code was compiled four separate times to display different output
======= Run #1 =======Enter number: 77331
Seven Seven Three Three One
======= Run #2 =======
Enter number: 234-43-1275
Two Three Four Four Three One Two Seven Five
======= Run #3 =======
Enter number: 1(800) 123-5678
One Eight Zero Zero One Two Three Five Six Seven Eight
======= Run #4 =======
Enter number: This 34 Is 24 A 5 Number 28
Three Four Two Four Five Two Eight
C++ || Snippet – Singly Linked List Custom Template Queue Sample Code

This page will consist of sample code for a custom singly linked list template queue. This implementation differs from the previously highlighted doubly linked list in that this version uses a single node to store its data rather than using two separate nodes (front and rear).
Looking for sample code for a stack? Click here.
REQUIRED KNOWLEDGE FOR THIS SNIPPET
Structs

Classes

Template Classes - What Are They?''

Queue - What is it?

FIFO - First In First Out

#include < queue>

Linked Lists - How To Use
This template class is a custom duplication of the Standard Template Library (STL) queue class. Whether you like building your own data structures, you simply do not like to use any inbuilt functions, opting to build everything yourself, or your homework requires you make your own data structure, this sample code is really useful. I feel its beneficial building functions such as this, that way you better understand the behind the scene processes.
|
1 2 3 4 5 6 7 8 9 10 11 12 13 14 15 16 17 18 19 20 21 22 23 24 25 26 27 28 29 30 31 32 33 34 35 36 37 38 39 40 41 42 43 44 45 46 47 48 49 50 51 52 53 54 55 56 57 58 59 60 61 62 63 64 65 66 67 68 69 70 71 72 73 74 75 76 77 78 79 80 81 82 83 84 85 86 87 88 89 90 91 92 93 94 95 96 97 98 99 100 101 102 103 104 105 106 107 108 109 110 111 112 113 114 115 116 117 118 119 120 121 122 123 124 125 126 127 128 129 130 131 132 133 134 135 136 137 138 139 140 141 142 143 144 145 146 147 148 149 150 151 152 153 154 155 156 157 158 159 160 161 162 163 164 165 166 167 168 169 170 171 172 173 174 175 176 177 178 179 180 181 182 183 184 185 186 187 188 189 190 191 192 193 194 195 196 197 198 199 200 201 202 203 204 205 206 207 208 209 210 211 212 213 214 |
// ============================================================================ // Author: K Perkins // Date: Jul 14, 2012 // Taken From: http://programmingnotes.org/ // File: SingleQueue.h // Description: This is a class which implements various functions // demonstrating the use of a queue. // ============================================================================ #include <iostream> template <class ItemType> class SingleQueue { public: SingleQueue(); /* Function: Constructor initializes queue Precondition: None Postcondition: Defines private variables */ bool IsEmpty(); /* Function: Determines whether queue is empty Precondition: Queue has been created Postcondition: The function = true if the queue is empty and the function = false if queue is not empty */ bool IsFull(); /* Function: Determines whether queue is full Precondition: Queue has been created Postcondition: The function = true if the queue is full and the function = false if queue is not full */ void EnQueue(ItemType item); /* Function: Adds new item to the back of the queue Precondition: Queue has been created and is not full Postcondition: Item is in the queue */ ItemType DeQueue(); /* Function: Returns and then deletes the first item in the queue Precondition: Queue has been created and is not empty Postcondition: The first item in the queue has been removed and the queue order is maintained */ ItemType Front(); /* Function: Returns (but does not delete) the first item in the queue Precondition: Queue has been created and is not empty Postcondition: The first item in the queue has been returned and the queue order is maintained */ ItemType Rear(); /* Function: Returns (but does not delete) the last item in the queue Precondition: Queue has been created and is not empty Postcondition: The last item in the queue has been returned and the queue order is maintained */ int Size(); /* Function: Return the current size of the queue Precondition: Queue has been initialized Postcondition: The size of the queue is returned */ void MakeEmpty(); /* Function: Initializes queue to an empty state Precondition: Queue has been created Postcondition: Queue no longer exists */ ~SingleQueue(); /* Function: Removes the queue Precondition: Queue has been declared Postcondition: Queue no longer exists */ private: struct NodeType { ItemType currentItem; NodeType* next; }; NodeType* head; // front of queue int size; }; //========================= Implementation ================================// template<class ItemType> SingleQueue<ItemType>::SingleQueue() { head = NULL; size = 0; }/* end of SingleQueue */ template<class ItemType> bool SingleQueue<ItemType>::IsEmpty() { return (head == NULL); }/* end of IsEmpty */ template<class ItemType> bool SingleQueue<ItemType>::IsFull() { try { NodeType* location = new NodeType; delete location; return false; } catch(std::bad_alloc&) { return true; } }/* end of IsFull */ template<class ItemType> void SingleQueue<ItemType>::EnQueue(ItemType newItem) { if(IsFull()) { std::cout<<"nQUEUE FULLn"; } else { NodeType* newNode = new NodeType; // adds new node newNode-> currentItem = newItem; newNode-> next = NULL; if(IsEmpty()) { head = newNode; } else { NodeType* tempPtr = head; while(tempPtr-> next != NULL) { tempPtr = tempPtr-> next; } tempPtr-> next = newNode; } ++size; } }/* end of EnQueue */ template<class ItemType> ItemType SingleQueue<ItemType>::DeQueue() { if(IsEmpty()) { std::cout<<"nQUEUE EMPTYn"; } else { NodeType* tempPtr = head; // temporary pointer ItemType item = head-> currentItem; head = head-> next; delete tempPtr; --size; return item; } }/* end of DeQueue */ template<class ItemType> ItemType SingleQueue<ItemType>::Front() { if(IsEmpty()) { std::cout<<"nQUEUE EMPTYn"; } else { ItemType item = head-> currentItem; return item; } }/* end of Front */ template<class ItemType> ItemType SingleQueue<ItemType>::Rear() { if(IsEmpty()) { std::cout<<"nQUEUE EMPTYn"; } else { NodeType* tempPtr = head; // temporary pointer while(tempPtr->next != NULL) { tempPtr = tempPtr-> next; } ItemType item = tempPtr-> currentItem; return item; } }/* end of Rear */ template<class ItemType> int SingleQueue<ItemType>::Size() { if(IsEmpty()) { std::cout<<"nQUEUE EMPTYn"; } return size; }/* end of Size */ template<class ItemType> void SingleQueue<ItemType>::MakeEmpty() { if(!IsEmpty()) { std::cout << "Destroying nodes ...n"; while(!IsEmpty()) { NodeType* tempPtr = head; //std::cout << tempPtr-> currentItem << 'n'; head = head-> next; delete tempPtr; } size = 0; } }/* end of MakeEmpty */ template<class ItemType> SingleQueue<ItemType>::~SingleQueue() { MakeEmpty(); }// http://programmingnotes.org/ |
QUICK NOTES:
The highlighted lines are sections of interest to look out for.
The code is heavily commented, so no further insight is necessary. If you have any questions, feel free to leave a comment below.
===== DEMONSTRATION HOW TO USE =====
Use of the above template class is the same as its STL counterpart. Here is a sample program demonstrating its use.
|
1 2 3 4 5 6 7 8 9 10 11 12 13 14 15 16 17 18 19 20 21 22 23 24 25 26 27 28 29 30 31 32 33 34 35 36 37 38 39 40 41 42 43 44 45 46 47 48 49 50 51 52 53 54 55 56 57 58 59 60 61 62 63 |
#include <iostream> #include "SingleQueue.h" using namespace std; int main() { // declare variables SingleQueue<char> charQueue; SingleQueue<int> intQueue; SingleQueue<double> doubleQueue; // ------ Char Example ------// char charArry[]="My Programming Notes Is A Big Help!"; int counter=0; while(charArry[counter]!='\0') { charQueue.EnQueue(charArry[counter]); ++counter; } cout<<"charQueue has "<<charQueue.Size()<<" items in it " <<"and contains the text:n"; while(!charQueue.IsEmpty()) { cout<<charQueue.DeQueue(); } cout<<endl; // ------ Int Example ------// int intArry[]={1,22,309,461,-92,66,7,8,1987,9,27,12}; counter=0; while(counter < sizeof(intArry)/sizeof(intArry[0])) { intQueue.EnQueue(intArry[counter]); ++counter; } cout<<"nintQueue has "<<intQueue.Size()<<" items in it.n" <<"The sum of the numbers in the queue is: "; counter=0; while(!intQueue.IsEmpty()) { counter-=intQueue.DeQueue(); } cout<<counter<<endl; // ------ Double Example ------// double doubleArry[]={31.62,2.8,43.9,4.4,19.87,6.23,7.787,68.99,9.6,3.540,12.04}; double sum=0; counter=0; while(counter < sizeof(doubleArry)/sizeof(doubleArry[0])) { doubleQueue.EnQueue(doubleArry[counter]); ++counter; } cout<<"ndoubleQueue has "<<doubleQueue.Size()<<" items in it.n" <<"The sum of the numbers in the queue is: "; while(!doubleQueue.IsEmpty()) { sum+=doubleQueue.DeQueue(); } cout<<sum<<endl; return 0; }// http://programmingnotes.org/ |
Once compiled, you should get this as your output
charQueue has 35 items in it and contains the text:

My Programming Notes Is A Big Help!
intQueue has 12 items in it.
The sum of the numbers in the queue is: -2817doubleQueue has 11 items in it.
The sum of the numbers in the queue is: 210.777
Press any key to continue . . .
Assembly || How To Obtain & Display Integer Data

Displaying text to the screen was discussed in the previous article, and this page will be more of the same. Utilizing the printf and scanf functions which are available in C, this page will demonstrate how to obtain and display integer data; and more importantly, demonstrate how to store a 64-bit integer into an assembly program.
==== Obtain & Display Integer Data ====
Here is our driver.c file, which starts things off.
|
1 2 3 4 5 6 7 8 9 10 11 12 13 14 15 16 17 18 19 20 21 22 23 24 25 26 27 28 29 30 31 32 33 34 35 36 37 38 39 40 41 42 43 44 45 |
// ========================================================================================================== // Author: K Perkins // Date: Jul 12, 2012 // Program: Display A Number // Taken From: http://programmingnotes.org/ // File: driver.c // // Purpose: This is the driver to the "Display A Number" program. Driver.c only calls displayNum.asm. This // file is used just as a "driver" and demostrates how to use a C file along with an Assembly file to // create one working program. Once the Assembly file finishes, control of the program is then passed back // to the driver.c file, then the program closes // // ----- These are the commands to link all the files together ------- // // (1) Compile driver.c file: gcc -c -Wall -m64 -std=c99 -l driver.lis -o driver.o driver.c // (2) displayNum.asm assembler file: nasm -f elf64 -l displayNum.lis -o displayNum.o displayNum.asm // (3) Link all files: gcc -m64 -o displayNum.out driver.o displayNum.o // (4) Execute in 64-bit protected mode: ./displayNum.out // // ===== Begin code area ==================================================================================== #include <stdio.h> // external function prototype extern unsigned long int DisplayNum(); int main() { // declare variable unsigned long int returnCode = 1987; // display message to the screen printf("nnWelcome to My Programming Notes' Assembly Program.n"); printf("nControl will now be passed to the Assembly file...nn"); // here is a function call to the assembly file, where the asm file passes // back a return code to this current file, which will be displayed below returnCode = DisplayNum(); printf("nControl has now been passed back from the Assembly file to the C file!n"); printf("nThe return code is: %lu", returnCode); printf("nnBYE!n"); return returnCode; }// http://programmingnotes.org/ |
The “driver” file really only has one task, and that is simply to call the assembly function named ‘DisplayNum()’ as noted on line 38. This is a routine that is present among all the code on this site. Click here for an explanation on why a “driver” is used.
And here is the assembly file.
|
1 2 3 4 5 6 7 8 9 10 11 12 13 14 15 16 17 18 19 20 21 22 23 24 25 26 27 28 29 30 31 32 33 34 35 36 37 38 39 40 41 42 43 44 45 46 47 48 49 50 51 52 53 54 55 56 57 58 59 60 61 62 63 64 65 66 67 68 69 70 71 72 73 74 75 76 77 78 79 80 81 82 83 84 85 86 87 88 89 90 91 92 93 94 95 96 97 98 99 100 101 102 103 104 105 106 107 108 109 110 111 112 113 114 115 116 117 118 119 120 121 122 123 124 125 126 127 128 |
;================================================================================================================ ; Author: K Perkins ; Date: Jul 12, 2012 ; Program: Display A Number ; Taken From: http://programmingnotes.org/ ; File: displayNum.asm ; ; Purpose: This is the displayNum.asm file which demonstrates how to obtain & display numbers to ; the screen in assembly using C functions. ; ;===== Begin code area ========================================================================================== extern printf ;External functions printf & scanf extern scanf ;taken from the C library which will be ;used for user input/output to the screen ; segment .data ;Place initialized data here ; ;======== Text declarations & variables which will be displayed to the user ===================================== getNumber db "Please enter a number: ",0 displayNumber db "The number you just entered is: ", 0 unsignedLongIntegerInput db "%lu", 0 stringDataOutput db "%s", 0 newLine db 10, 0 displayLineSeperator db "--------------------------------------------",10,0 ; ;;========= End of text declarations which will be displayed to the user ======================================== ; segment .bss ;Place un-initialized data here ; myInt resq 1 ;Pointer for use by scanf to store a number from the user ; segment .text ;Place instruction code here ; global DisplayNum ;DisplayNum- the declarationthat is visible ;for other programs to link to it ; DisplayNum: ;This is an entry point. Execution will begin here. ; ;============= Push registers to the stack ====================================================================== ;safe programming which pushes all registers to the stack so data doesnt get corrupted push rbp push rbx push rcx push rdx push rdi push rsi push rbp push r8 push r9 push r10 push r11 push r12 push r13 push r14 push r15 ; ;================ End of Push Registers ========================================================================= ; ; Left side: X86 instructions ;Right side: the narrative 'A.K.A'the story about this program. ; ;===== #1 Display Line Seperator ================================================================================ mov qword rdi, stringDataOutput ;Prepare printf for string output mov qword rsi, displayLineSeperator ;The 'line seperator' is displayed mov qword rax, 0 ;No vector registers used call printf ;printf is going to output the data ; ;===== #2 Prompt The User For Integer Input ===================================================================== mov qword rdi, stringDataOutput ;Prepare printf for string output mov qword rsi, getNumber ;A Prompt to enter in a number will be displayed mov qword rax, 0 ;No vector registers used call printf ;printf is going to output the data ; ;===== #3 This Obtains User Input Using Scanf =================================================================== mov qword rdi, unsignedLongIntegerInput ;Prepare scanf to get one 64-bit integer mov qword rsi, myInt ;Set up indirect addressing for scanf mov qword rax, 0 ;No vector registers used. call scanf ;The unsigned long integer is placed into 'myInt' ; ;===== #4 Prompt The User That An Integer Will Be Displayed ===================================================== mov qword rdi, stringDataOutput ;Prepare printf for string output mov qword rsi, displayNumber ;A Prompt to display the number will be displayed mov qword rax, 0 ;No vector registers used call printf ;printf is going to output the data ; ;===== #5 Display The Number To User ============================================================================ mov qword rdi, unsignedLongIntegerInput ;Prepare printf to output one 64-bit integer mov qword rsi, [myInt] ;'myInt' will be passed to printf mov qword rax, 0 ;No vector registers used. call printf ;printf is going to output the data ; ;===== #6 This Prints A Newline ================================================================================= mov qword rdi, stringDataOutput ;Prepare printf to make string output mov qword rsi, newLine ;The newline character ascii code is passed to printf mov qword rax, 0 ;No vector registers used. call printf ;printf is going to output the data ; ;===== #7 Display Line Seperator ================================================================================ mov qword rdi, stringDataOutput ;Prepare printf for string output mov qword rsi, displayLineSeperator ;The 'line seperator' is displayed mov qword rax, 0 ;No vector registers used call printf ;printf is going to output the data ; ; END CODE EXECUTION FOR DISPLAYNUM.ASM ; ;====== pop the registers back from the in reverse order stack ================================================== pop r15 pop r14 pop r13 pop r12 pop r11 pop r10 pop r9 pop r8 pop rbp pop rsi pop rdi pop rdx pop rcx pop rbx pop rbp ; ;===== END - RETURN TO CALLED FUNCTION ========================================================================== mov rax, 0 ;return 0 to the called function ret ;ret pops the stack taking away 8 bytes ; ; http://programmingnotes.org/ ; ;===== End of DisplayNum subprogram ============================================================================= |
QUICK NOTES:
The highlighted lines are sections of interest to look out for.
The text declarations highlighted under the segment .data section are important, particularly the variable named “unsignedLongIntegerInput.” That variable is used to obtain data from the user, as noted on line 74-77. Note, that this same variable is also used to display the integer data back to the user, which is also displayed on lines 86-89.
The rest of the code is heavily commented, so no further insight is necessary. If you have any questions, feel free to leave a comment below.
After you assemble the above code (see below), you should get this as your output:
Welcome to My Programming Notes' Assembly Program.Control will now be passed to the Assembly file...
--------------------------------------------
Please enter a number: 1858
The number you just entered is: 1858
--------------------------------------------Control has now been passed back from the Assembly file to the C file!
The return code is: 0
BYE!
==== ASSEMBLING THE CODE ====
This can be achieved by simply opening the teminal, and doing a copy/paste of the commands listed on the ‘driver.c’ file, lines 15 thru 18. Make sure to compile them in order for the sake of continuity.
|
1 2 3 4 |
(1) Compile driver.c file: gcc -c -Wall -m64 -std=c99 -l driver.lis -o driver.o driver.c (2) displayNum.asm assembler file: nasm -f elf64 -l displayNum.lis -o displayNum.o displayNum.asm (3) Link all files: gcc -m64 -o displayNum.out driver.o displayNum.o (4) Execute in 64-bit protected mode: ./displayNum.out |
Be advised, that the commands to assemble the code is designed to run in 64-bit mode. If you are not running a 64-bit machine, the commands will most likely fail to assemble.
If you are running a Windows computer and would like to assemble the code, look here or here for information.
You will need to change the 64-bit registers to 32-bit registers in the “displayNum.asm” file, aswell as removing lines 41-55 and lines 106-120 respectively in order to run the program successfully.
C++ || Char Array – Palindrome Number Checker Using A Character Array, Strlen, Strcpy, & Strcmp

The following is a palindromic number checking program, which demonstrates more use of character array’s, Strlen, & Strcmp.
Want sample code for a palindrome checker which works for numbers and words? Click here.
REQUIRED KNOWLEDGE FOR THIS PROGRAM
Character Arrays

How to reverse a character array

Palindrome - What is it?

Strlen

Strcpy

Strcmp

Isdigit

Atoi - Convert a char array to a number

Do/While Loops

For Loops
This program first asks the user to enter a number that they wish to compare for similarity. If the number which was entered into the system is a palindrome, the program will prompt a message to the user via cout. This program determines similarity by using the strcmp function to compare two arrays together. Using a for loop, this program also demonstrates how to reverse a character array, aswell as demonstrates how to determine if the text contained in a character array is a number or not.
This program will repeatedly prompt the user for input until an “exit code” is obtained. The designated exit code in this program is the number 0 (zero). So the program will not stop asking for user input until the number 0 is entered into the program.
|
1 2 3 4 5 6 7 8 9 10 11 12 13 14 15 16 17 18 19 20 21 22 23 24 25 26 27 28 29 30 31 32 33 34 35 36 37 38 39 40 41 42 43 44 45 46 47 48 49 50 51 52 53 54 55 56 57 58 59 60 61 62 63 64 65 66 67 68 69 70 71 72 73 74 75 76 77 78 79 80 81 82 83 84 85 86 87 88 89 90 91 92 93 94 95 96 97 98 99 100 101 102 103 104 105 |
// ============================================================================ // Author: Kenneth Perkins // Date: Jul 10, 2012 // Taken From: http://programmingnotes.org/ // File: palindrome.cpp // Description: Palindrome number checker // ============================================================================ #include <iostream> #include <cctype> #include <cstring> #include <cstdlib> using namespace std; // function prototypes void Reverse(char arry[]); bool IsArryANum(char arry[]); // constant, which is the exit value const char* EXIT_VALUE = "0"; int main() { // declare variables char arry[80]; char arryReversed[80]; do{// get data from user using do/while loop cout<<"\nEnter a positive integer, or ("<<EXIT_VALUE<<") to exit: "; cin >> arry; if(atoi(arry) < 0) // check for negative numbers { cout <<"\n*** Error: "<<arry<<" must be greater than zero\n"; } else if(!IsArryANum(arry)) // check for any letters { cout <<"\n*** Error: "<<arry<<" is not an integer\n"; } else if(strcmp(EXIT_VALUE, arry) == 0) // check for "exit code" { cout <<"\nExiting program...\n"; } else // if all else is good, determine if number is a palindrome { // copy the user input from the first array (arry) // into the second array (arryReversed) strcpy(arryReversed, arry); // function call to reverse the contents inside the // "arryReversed" array to check for similarity Reverse(arryReversed); cout <<endl<<arry; // use strcmp to determine if the two arrays are the same if(strcmp(arryReversed, arry) == 0) { cout <<" is a Palindrome..\n"; } else { cout <<" is NOT a Palindrome!\n"; } } }while(strcmp(EXIT_VALUE, arry) != 0); // keep going until user enters the exit value cout <<"\nBYE!\n"; return 0; }// end of main void Reverse(char arry[]) { // get the length of the current word in the array index int length = strlen(arry)-1; // increment thru each letter within the current char array index // reversing the order of the array for (int currentChar=0; currentChar < length; --length, ++currentChar) { // copy 1st letter in the array index into temp char temp = arry[currentChar]; // copy last letter in the array index into the 1st array index arry[currentChar] = arry[length]; // copy temp into last array index arry[length] = temp; } }// end of Reverse bool IsArryANum(char arry[]) { // LOOP UNTIL U REACH THE NULL CHARACTER, // AKA THE END OF THE CHAR ARRAY for(int x=0; arry[x]!='\0'; ++x) { // if the current char isnt a number, // exit the loop & return false if(!isdigit(arry[x])) { return false; } } return true; }// http://programmingnotes.org/ |
QUICK NOTES:
The highlighted lines are sections of interest to look out for.
The code is heavily commented, so no further insight is necessary. If you have any questions, feel free to leave a comment below.
Once compiled, you should get this as your output
Enter a positive integer, or (0) to exit: L33T*** error: "L33T" is not an integer
Enter a positive integer, or (0) to exit: -728
*** error: -728 must be greater than zero
Enter a positive integer, or (0) to exit: 1858
1858 is NOT a Palindrome!
Enter a positive integer, or (0) to exit: 7337
7337 is a Palindrome..
Enter a positive integer, or (0) to exit: 0
Exiting program...
BYE!
Assembly || Hello World!
This page will consist of creating the typical “hello world!” application. if you have never programmed in assembly before, this will be very interesting as the syntax is very different from most high level programming languages.
As noted on the introductory page, the assembly code presented on this site (X86-64) was assembled using The Netwide Assembler (NASM) under the Unix platform (Ubuntu) in association with C/C++ files. The purpose of combining Assembly code in association with C/C++ files is to demonstrate how each language “talks” to each other. Also, more importantly it is because today, it is unusual to create a stand alone program written completely in assembly language. Why is that the case? Because It is much easier and faster to program in a high level language than it is in assembly. So why should you learn assembly? Learning assembly can be most useful to help one gain a deeper understanding of how computers work, aswell as helping one to better understand how compilers and higher level languages like C work.
==== HELLO WORLD ====
All of the programs presented on this site will start with a simple C or C++ driver program like so:
|
1 2 3 4 5 6 7 8 9 10 11 12 13 14 15 16 17 18 19 20 21 22 23 24 25 26 27 28 29 30 31 32 33 34 35 36 37 38 39 40 41 42 43 44 45 46 |
// =================================================================================== // Author: K Perkins // Date: Jul 9, 2012 // Program: Hello World // Taken From: http://programmingnotes.org/ // File: driver.c // // Purpose: This is the driver to the Hello World program. Driver.c only calls // helloWorld.asm. This file is used just as a "driver" and demostrates how to use a // C file along with an Assembly file to create one working program. Once the Assembly // file displays "Hello World" to the screen, control of the program is passed // back to the driver.c file, then the program closes // // ----- These are the commands to link all the files together ------- // // (1) Compile driver.c file: gcc -c -Wall -m64 -std=c99 -l driver.lis -o driver.o driver.c // (2) helloWorld.asm assembler file nasm -f elf64 -l helloWorld.lis -o helloWorld.o helloWorld.asm // (3) Link all files: gcc -m64 -o helloWorld.out driver.o helloWorld.o // (4) Execute in 64-bit protected mode: ./helloWorld.out // // ===== Begin code area ============================================================== #include <stdio.h> // external function prototype extern unsigned long int DisplayHelloWorld(); int main() { // declare variable unsigned long int returnCode = 1987; // display message to the screen printf("nnWelcome to My Programming Notes' Assembly Program.n"); printf("nControl will now be passed to the Assembly file...nn"); // here is a function call to the assembly file, where the asm file passes // back a return code to this current file, which will be displayed below returnCode = DisplayHelloWorld(); printf("nControl has now been passed back from the Assembly file to the C file!n"); printf("nThe return code is: %lu", returnCode); printf("nnBYE!n"); return returnCode; }// http://programmingnotes.org/ |
The “driver” file really only has one task, and that is simply to call the assembly function named ‘DisplayHelloWorld()’ as noted on line 39. This is a routine that will be present among all the code on this site.
There are several advantages in using the C driver routine. First, this lets the C system set up the program to run correctly in protected mode. All the segments and their corresponding segment registers will be initialized by C. The assembly code doesn’t need to worry about any of this. Secondly, the C library will also be available to be used by the assembly code.
The following shows a simple assembly program utilizing the C function “printf” to display ‘Hello World’ to the screen.
|
1 2 3 4 5 6 7 8 9 10 11 12 13 14 15 16 17 18 19 20 21 22 23 24 25 26 27 28 29 30 31 32 33 34 35 36 37 38 39 40 41 42 43 44 45 46 47 48 49 50 51 52 53 54 55 56 57 58 59 60 61 62 63 64 65 66 67 68 69 70 71 72 73 74 75 76 77 78 79 80 81 82 83 84 85 86 87 88 89 90 91 92 93 94 95 96 97 98 99 100 101 102 |
;===================================================================================== ; Author: K Perkins ; Date: Jul 9, 2012 ; Program: Hello World ; Taken From: http://programmingnotes.org/ ; File: helloWorld.asm ; ; Purpose: This is the helloWorld.asm file which demonstrates how to display text to ; the screen in assembly using C libraries. ; ;===== Begin code area =============================================================== extern printf ;External function printf taken ;from the C library which will be ;used to display output to the screen ; segment .data ;Place initialized data here ; ;======== Text declarations & variables which will be displayed to the user ========== displayMessage db "Hello World!",10, 0 specifierForStringData db "%s", 0 displayLineSeperator db "--------------------------------------------",10,0 ; ;;========= End of text declarations which will be displayed to the user ============= ; segment .bss ;Place un-initialized data here ; segment .text ;Place instruction code here ; global DisplayHelloWorld ;DisplayHelloWorld- the declaration ;that is visible for other programs ;to link to it ; DisplayHelloWorld: ;This is an entry point. Execution ;will begin here. ; ;============= Push registers to the stack =========================================== ;safe programming which pushes all registers to the stack so data doesnt get corrupted push rbp push rbx push rcx push rdx push rdi push rsi push rbp push r8 push r9 push r10 push r11 push r12 push r13 push r14 push r15 ; ;================ End of Push Registers ============================================== ; ; Left side: X86 instructions ;Right side: the narrative 'A.K.A' ;the story about this program. ; ;===== #1 Display Line Seperator ===================================================== mov qword rdi, specifierForStringData ;Prepare printf for string output mov qword rsi, displayLineSeperator ;The 'line seperator' is displayed mov qword rax, 0 ;No vector registers used call printf ;printf is going to output the data ; ;===== #2 Display Hello World ======================================================== mov qword rdi, specifierForStringData ;Prepare printf for string output mov qword rsi, displayMessage ;Hello World will be displayed mov qword rax, 0 ;No vector registers used call printf ;printf is going to output the data ; ;===== #3 Display Line Seperator ===================================================== mov qword rdi, specifierForStringData ;Prepare printf for string output mov qword rsi, displayLineSeperator ;The 'line seperator' is displayed mov qword rax, 0 ;No vector registers used call printf ;printf is going to output the data ; ; END CODE EXECUTION FOR HELLOWORLD.ASM ; ;====== pop the registers back from the stack in reverse order ======================== pop r15 pop r14 pop r13 pop r12 pop r11 pop r10 pop r9 pop r8 pop rbp pop rsi pop rdi pop rdx pop rcx pop rbx pop rbp ; ;===== END - RETURN TO CALLED FUNCTION =============================================== mov rax, 0 ;return 0 to the called function ret ;ret pops the stack taking away 8 bytes ; ; http://programmingnotes.org/ ; ;===== End of DisplayHelloWorld subprogram =========================================== |
Line 16 of the program defines a section that specifies memory to be stored in the data segment (whose name is .data). Only initialized data should be defined in this segment. On lines 19 to 21, several strings are declared. They will be printed with the C library, so they must be terminated with a null character (ASCII code 0). Remember there is a big difference between 0 and ’0’. Note, the number 10 is the ASCII code for a newline.
Uninitialized data should be declared in the .bss segment (named .bss on line 25). This segment gets its name from an early UNIX-based assembler operator that meant “block started by symbol.”
The code segment named .text is where instructions are placed. Note that if you are using Windows, the code label for the main routine (line 29 and 33) should have an underscore prefix, so it would be _DisplayHelloWorld. You would also need to do the same for printf (so it would be _printf). This is part of the C calling convention. This convention specifies the rules C uses when compiling code. It is very important to know this convention when interfacing C and assembly. (Note: This rule is specifically for DOS/Windows, the Linux C compiler does not prepend anything to C symbol names.)
The global directive on line 29 tells the assembler to make the asm main label global. Unlike in C, labels have internal scope by default. This means that only code in the same module can use the label. The global directive gives the specified label (or labels) external scope.
And there you have it! After you assemble the above code (see below), you should get this as your output
Welcome to My Programming Notes' Assembly Program.
Control will now be passed to the Assembly file...
--------------------------------------------
Hello World!
--------------------------------------------Control has now been passed back from the Assembly file to the C file!
The return code is: 0
BYE!
==== ASSEMBLING THE CODE ====
This can be achieved by simply opening the teminal, and doing a copy/paste of the commands listed on the ‘driver.c’ file, lines 16 thru 19. Make sure to compile them in order for the sake of continuity.
|
1 2 3 4 |
(1) Compile driver.c file: gcc -c -Wall -m64 -std=c99 -l driver.lis -o driver.o driver.c (2) helloWorld.asm assembler file: nasm -f elf64 -l helloWorld.lis -o helloWorld.o helloWorld.asm (3) Link all files: gcc -m64 -o helloWorld.out driver.o helloWorld.o (4) Execute in 64-bit protected mode: ./helloWorld.out |
Be advised, that the commands to assemble the code is designed to run in 64-bit mode. If you are not running a 64-bit machine, the commands will most likely fail to assemble.
If you are running a Windows computer and would like to assemble the code, look here or here for information.
You will need to change the 64-bit registers to 32-bit registers in the “helloWorld.asm” file, aswell as removing lines 38-52 and lines 80-94 respectively in order to run the program successfully.
Assembly || Which Assembler To Use?

A common question one may wonder is, which assembler should I use? There are a few choices, and your choice should probably be based on the type of platform you decide to operate with.
In terms of Assembly, there is a whole family of languages each specific to a different processor, and each language has several different names for a single language. These are the following designations which are often seen: IA-32, X86-32, X86-i386, 80×86, X86, X86-16, IA-64, X86-64, and so on. Some of those early languages are now obsolete. The extension of Assembly which will be presented on this site is the x86 instruction set, specifically being X86-64 (which is known as IA-64 in some documents). The X86-64 Assembly code will be assembled using the Unix platform (Ubuntu) in association with C/C++ files, demonstrating how each language “talks” to each other.
As far as which assembler to use, there are a few high level ones which are available to choose from. Some high level assemblers are Borland’s TASM, The Netwide Assembler’s NASM, Microsoft’s MASM, IBM’s HLASM (for z/Architecture systems), Alessandro Ghignola’s Linoleum, and Niklaus Wirth’s PL/360.
Of the assemblers listed above, The Netwide Assembler (NASM) is the recommended choice, as it is open source and free of charge. The Microsoft Macro Assembler (MASM), and The Borland Company’s Turbo Assembler (TASM) can also be used to learn Assembly Language. You may use other assemblers if you wish, though it is not guaranteed that the code presented on this site will work for assemblers other than NASM.
==== INSTALLING NASM ====
– On Windows –
(1) Visit the NASM homepage, and click on the tab which says "Downloads"(2) Click on the link to the most current version of NASM, downloading the most recent archive for NASM (the zip file) located under the "win32" directory
(3) Once you've obtained the appropriate archive for NASM, nasm-XXX-dos.zip or nasm-XXX-win32.zip (where XXX denotes the version number of NASM contained in the archive), unpack it into its own directory (for example c:nasm).
Note: You can alternatively download the installer file located in the "win32" directory which will install NASM for you, forgoing the remaining steps.
(4) The archive will contain a set of executable files: the NASM executable file nasm.exe, the NDISASM executable file ndisasm.exe, and possibly additional utilities to handle the RDOFF file format.
(5) The only file NASM needs to run is its own executable, so copy nasm.exe to a directory on your PATH, or alternatively edit autoexec.bat to add the nasm directory to your PATH (to do that under Windows XP, go to Start > Control Panel > System > Advanced > Environment Variables; these instructions may work under other versions of Windows as well.)
(6) That's it - NASM is installed. You don't need the nasm directory to be present to run NASM (unless you've added it to your PATH), so you can delete it if you need to save space; however, you may want to keep the documentation or test programs.
– On Ubuntu –
NASM is currently located in the Ubuntu repository, so you can install it by simply opening the terminal window and entering the command:
sudo apt-get install nasm
– On Other Versions Of Unix –
(1) Visit the NASM homepage, and click on the tab which says "Downloads"(2) Once you've obtained the Unix source archive for NASM, nasm-XXX.tar.gz (where XXX denotes the version number of NASM contained in the archive), unpack it into a directory such as /usr/local/src. The archive, when unpacked, will create its own subdirectory nasm-XXX.
(3) NASM is an auto-configuring package: once you've unpacked it, cd to the directory it's been unpacked into and type ./configure. This shell script will find the best C compiler to use for building NASM and set up Makefiles accordingly.
(4) Once NASM has auto-configured, you can type make to build the nasm and ndisasm binaries, and then make install to install them in /usr/local/bin and install the man pages nasm.1 and ndisasm.1 in /usr/local/man/man1. Alternatively, you can give options such as --prefix to the configure script (see the file INSTALL for more details), or install the programs yourself.
(5) NASM also comes with a set of utilities for handling the RDOFF custom object-file format, which are in the rdoff subdirectory of the NASM archive. You can build these with make rdf and install them with make rdf_install, if you want them.
Note: Instructions for installing NASM was taken from the official website located here. If you need further assistance installing NASM onto your computer, check out the help forums.
Java || Snippet – How To Convert A Decimal Number Into Binary
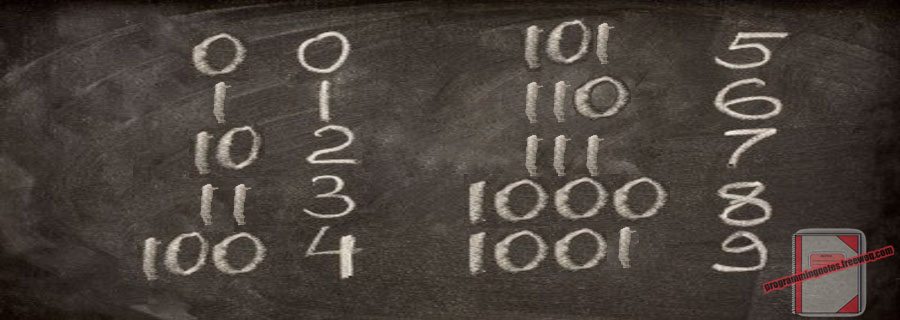
This page will demonstrate how to convert a decimal number (i.e a whole number) into its binary equivalent. So for example, if the decimal number of 25 was entered into the program, it would display the converted binary value of 11001.
REQUIRED KNOWLEDGE FOR THIS SNIPPET
How To Count In Binary

The "Long" Datatype - What Is It?

Methods (A.K.A "Functions") - What Are They?

While Loops

Online Binary to Decimal Converter - Verify For Correct Results
If you are looking for sample code which converts binary to decimal, check back here soon!
|
1 2 3 4 5 6 7 8 9 10 11 12 13 14 15 16 17 18 19 20 21 22 23 24 25 26 27 28 29 30 31 32 33 34 35 36 37 38 39 40 41 42 43 44 45 46 47 48 49 50 51 52 53 54 55 |
import java.util.Scanner; public class DecimalToBinary { // global variable declaration static Scanner cin = new Scanner(System.in); public static void main(String[] args) { // declare variables long decNum = 0; String binaryNum = ""; // use a string instead of an int to avoid // overflow, because binary numbers can grow large quick // display message to screen System.out.println("Welcome to My Programming Notes' Java Program.n"); // get decimal number from user System.out.print("Please enter an integer value: "); decNum = cin.nextLong(); if(decNum < 0) // if user inputs a neg number, make the binary num neg too { binaryNum = "-"; } // method call to convert decimal to binary binaryNum += DecToBin(decNum); // display data to user System.out.println("nThe integer value of "+ decNum + " = " + binaryNum + " in binary"); }// end of main public static String DecToBin(long decNum) { // use this string to save the binary number String binary = ""; if(decNum < 0) // if input is a neg number, make it positive { decNum *= -1; } // converts decimal to binary using division and modulus while(decNum > 0) { binary += (decNum % 2); decNum /= 2; } // return the reversed string to main return new StringBuffer(binary).reverse().toString(); } }// http://programmingnotes.org/ |
QUICK NOTES:
The highlighted lines are sections of interest to look out for.
The code is heavily commented, so no further insight is necessary. If you have any questions, feel free to leave a comment below.
Once compiled, you should get this as your output
Note: The code was compiled 3 separate times to display different output
====== RUN 1 ======Welcome to My Programming Notes' Java Program.
Please enter an integer value: 5
The integer value of 5 = 101 in binary
====== RUN 2 ======
Welcome to My Programming Notes' Java Program.
Please enter an integer value: -25
The integer value of -25 = -11001 in binary
====== RUN 3 ======
Welcome to My Programming Notes' Java Program.
Please enter an integer value: 12345678910
The integer value of 12345678910 = 1011011111110111000001110000111110 in binary
Java || Searching An Integer Array For A Target Value

Here is another actual homework assignment which was presented in an intro to programming class which was used to introduce more practice using integer arrays.
REQUIRED KNOWLEDGE FOR THIS PROGRAM
Integer Arrays

For Loops

Methods (A.K.A "Functions") - What Are They?

Final Variables

If/Else Statements
This is a small and simple program which demonstrates how to search for a target value which is stored in an integer array. This program first prompts the user to enter five values into an int array. After the user enters all the values into the system, it then displays a prompt asking the user for a search value. Once it has a search value, the program searches through the array looking for the target value; and wherever the value is found, the program display’s the current array index in which that target value is located. After it displays all the locations where the target value resides, it display’s the total number of occurrences the search value was found within the array.
|
1 2 3 4 5 6 7 8 9 10 11 12 13 14 15 16 17 18 19 20 21 22 23 24 25 26 27 28 29 30 31 32 33 34 35 36 37 38 39 40 41 42 43 44 45 46 47 48 49 50 51 52 53 54 55 56 57 58 59 60 61 62 63 64 65 66 67 68 69 70 71 |
import java.util.Scanner; public class ArraySearch { // global variable declaration static Scanner cin = new Scanner(System.in); static final int NUM_INTS = 5; public static void main(String[] args) { // declare variables int searchValue = 0; int numOccurences = 0; int[] numValues = new int[NUM_INTS]; // int array size is initialized with a const value // display message to screen System.out.println("Welcome to My Programming Notes' Java Program.n"); // get data from user via a 'for loop' System.out.println("Please enter "+ NUM_INTS +" integer values:"); for (int index=0; index < NUM_INTS; ++index) { System.out.print("#" + (index + 1) + ": "); numValues[index] = cin.nextInt(); } // get a search value from the user System.out.print("Please enter a search value: "); searchValue = cin.nextInt(); System.out.println(""); // finds the number of occurences the search value was found in the array numOccurences = SearchArray(numValues, searchValue); // display data to user System.out.println("nThe total occurrences of value "+ searchValue + " within the array is: " + numOccurences); }// end of main // ==== SearchArray =========================================================== // // This method will take as input the array, the number of array // elements, and the target value to search for. The function will traverse // the array looking for the target value, and when it finds it, display the // index location within the array. // // Input: // limit [IN] -- the array, the number of array // elements, and the target value // // Output: // The total number of occurrences of the target value in the array // // ============================================================================ public static int SearchArray(int[] numValues, int searchValue) { int numFound=0; for (int index=0; index < NUM_INTS; ++index) { if (numValues[index] == searchValue) { System.out.println("t" + searchValue + " was found at array " + "index #" + index); ++numFound; // if the search values was found, // increment the variable by 1 } } return numFound; } }// http://programmingnotes.org/ |
QUICK NOTES:
The highlighted lines are sections of interest to look out for.
The code is heavily commented, so no further insight is necessary. If you have any questions, feel free to leave a comment below.
Once compiled, you should get this as your output:
Note: The code was compiled 3 separate times to display the different outputs its able to produce
====== RUN 1 ======Welcome to My Programming Notes' Java Program.
Please enter 5 integer values:
#1: 25
#2: 25
#3: 25
#4: 25
#5: 25
Please enter a search value: 2525 was found at array index #0
25 was found at array index #1
25 was found at array index #2
25 was found at array index #3
25 was found at array index #4The total occurrences of value 25 within the array is: 5
====== RUN 2 ======
Welcome to My Programming Notes' Java Program.
Please enter 5 integer values:
#1: 8
#2: 19
#3: 97
#4: 56
#5: 8
Please enter a search value: 88 was found at array index #0
8 was found at array index #4The total occurrences of value 8 within the array is: 2
====== RUN 3 ======
Welcome to My Programming Notes' Java Program.
Please enter 5 integer values:
#1: 78
#2: 65
#3: 3
#4: 45
#5: 89
Please enter a search value: 12The total occurrences of value 12 within the array is: 0


