


Tag Archives: c++
C++ || How To Pad Left, Pad Right & Pad Center A String Of Fixed Length Using C++

The following is a module with functions which demonstrates how to pad left, pad right, and pad center a string of a fixed length using C++.
The functions demonstrated on this page left, right, and center aligns the characters in a string by padding them on the left and right with a specified character, of a specified total length.
The returned string is padded with as many padding characters needed to reach a length of the specified total width.
The padding character is user defined, but if no padding character is specified, the string is padded using a whitespace (‘ ‘).
1. Pad Left
The example below demonstrates the use of ‘Utils::padLeft‘ to right align the characters in a string by padding them on the left with a specified character, of a specified total length.
In this example, the default padding character is used to pad the string, which is a whitespace (‘ ‘).
|
1 2 3 4 5 6 7 8 9 10 11 12 13 14 15 16 17 |
// Pad Left // Declare string std::string original = "<-Kenneth->"; // Get padding width int width = 15; // Display result std::cout << "Original: '" << original << "'" << std::endl; std::cout << "Pad Left: '" << Utils::padLeft(original, width) << "'"; // expected output: /* Original: '<-Kenneth->' Pad Left: ' <-Kenneth->' */ |
2. Pad Right
The example below demonstrates the use of ‘Utils::padRight‘ to left align the characters in a string by padding them on the right with a specified character, of a specified total length.
In this example, the default padding character is used to pad the string, which is a whitespace (‘ ‘).
|
1 2 3 4 5 6 7 8 9 10 11 12 13 14 15 16 17 |
// Pad Right // Declare string std::string original = "<-Kenneth->"; // Get padding width int width = 15; // Display result std::cout << "Original: '" << original << "'" << std::endl; std::cout << "Pad Right: '" << Utils::padRight(original, width) << "'"; // expected output: /* Original: '<-Kenneth->' Pad Right: '<-Kenneth-> ' */ |
3. Pad Center
The example below demonstrates the use of ‘Utils::padCenter‘ to center align the characters in a string by padding them on the left and right with a specified character, of a specified total length.
In this example, the default padding character is used to pad the string, which is a whitespace (‘ ‘).
|
1 2 3 4 5 6 7 8 9 10 11 12 13 14 15 16 17 |
// Pad Center // Declare string std::string original = "<-Kenneth->"; // Get padding width int width = 15; // Display result std::cout << "Original: '" << original << "'" << std::endl; std::cout << "Pad Center: '" << Utils::padCenter(original, width) << "'"; // expected output: /* Original: '<-Kenneth->' Pad Center: ' <-Kenneth-> ' */ |
4. Utils Namespace
The following is the Utils Namespace. Include this in your project to start using!
|
1 2 3 4 5 6 7 8 9 10 11 12 13 14 15 16 17 18 19 20 21 22 23 24 25 26 27 28 29 30 31 32 33 34 35 36 37 38 39 40 41 42 43 44 45 46 47 48 49 50 51 52 53 54 55 56 57 58 59 60 61 62 63 64 65 66 67 |
// ============================================================================ // Author: Kenneth Perkins // Date: Aug 2, 2021 // Taken From: http://programmingnotes.org/ // File: Utils.h // Description: Handles general utility functions // ============================================================================ #pragma once #include <string> namespace Utils { /** * FUNCTION: padLeft * USE: Returns a new string that right aligns the characters in a * string by padding them on the left with a specified * character, of a specified total length * @param source: The source string * @param totalWidth: The number of characters to pad the source string * @param paddingChar: The padding character * @return: The modified source string left padded with as many paddingChar * characters needed to create a length of totalWidth */ std::string padLeft(std::string source, std::size_t totalWidth, char paddingChar = ' ') { if (totalWidth > source.size()) { source.insert(0, totalWidth - source.size(), paddingChar); } return source; } /** * FUNCTION: padRight * USE: Returns a new string that left aligns the characters in a * string by padding them on the right with a specified * character, of a specified total length * @param source: The source string * @param totalWidth: The number of characters to pad the source string * @param paddingChar: The padding character * @return: The modified source string right padded with as many paddingChar * characters needed to create a length of totalWidth */ std::string padRight(std::string source, std::size_t totalWidth, char paddingChar = ' ') { if (totalWidth > source.size()) { source.insert(source.size(), totalWidth - source.size(), paddingChar); } return source; } /** * FUNCTION: padCenter * USE: Returns a new string that center aligns the characters in a * string by padding them on the left and right with a specified * character, of a specified total length * @param source: The source string * @param totalWidth: The number of characters to pad the source string * @param paddingChar: The padding character * @return: The modified source string padded with as many paddingChar * characters needed to create a length of totalWidth */ std::string padCenter(std::string source, std::size_t totalWidth, char paddingChar = ' ') { if (totalWidth > source.size()) { std::size_t totalPadWidth = totalWidth - source.size(); std::size_t leftPadWidth = (totalPadWidth / 2) + source.size(); source = padRight(padLeft(source, leftPadWidth, paddingChar), totalWidth, paddingChar); } return source; } }// http://programmingnotes.org/ |
5. More Examples
Below are more examples demonstrating the use of the ‘Utils‘ Namespace. Don’t forget to include the module when running the examples!
|
1 2 3 4 5 6 7 8 9 10 11 12 13 14 15 16 17 18 19 20 21 22 23 24 25 26 27 28 29 30 31 32 33 34 35 36 37 38 |
// ============================================================================ // Author: Kenneth Perkins // Date: Aug 2, 2021 // Taken From: http://programmingnotes.org/ // File: program.cpp // Description: The following demonstrates the use of the Utils Namespace // ============================================================================ #include <iostream> #include <string> #include <exception> #include "Utils.h" void display(const std::string& message); int main() { try { // Declare string std::string original = "<-Kenneth->"; // Get padding width int width = 15; // Display result display("Original: '" + original + "'"); display("Pad Center: '" + Utils::padCenter(original, width) + "'"); display("Pad Right: '" + Utils::padRight(original, width) + "'"); display("Pad Left: '" + Utils::padLeft(original, width) + "'"); } catch (std::exception& e) { display("\nAn error occurred: " + std::string(e.what())); } std::cin.get(); return 0; } void display(const std::string& message) { std::cout << message << std::endl; }// http://programmingnotes.org/ |
QUICK NOTES:
The highlighted lines are sections of interest to look out for.
The code is heavily commented, so no further insight is necessary. If you have any questions, feel free to leave a comment below.
C++ || How To Join & Concatenate An Array/Vector/Container Into A Delimited String Using C++
The following is a module with functions which demonstrates how to join and concatenate an array/vector/container into a delimited string using C++.
The function demonstrated on this page joins a container and returns the concatenated string according to the separator(s). The delimiter separator is included in the returned string only if there is more than one element.
The separator can be either a single character or multiple characters. If no separating characters are specified, the string is joined using a comma (‘,’).
1. Join – Integer Array
The example below demonstrates the use of ‘Utils::join‘ to join an array into a delimiter separated string.
In this example, the default separator is used to join the array, which is a comma (‘,’).
|
1 2 3 4 5 6 7 8 9 10 11 12 13 14 15 16 17 18 |
// Join - Integer Array // Declare data int arry[] = { 1987, 19, 22, 2009, 2019, 1991, 28, 31 }; // Get array size int size = sizeof(arry) / sizeof(arry[0]); // Join using default separator std::string results = Utils::join(arry, arry + size); // Display results std::cout << results; // expected output: /* 1987,19,22,2009,2019,1991,28,31 */ |
2. Join – String Vector
The example below demonstrates the use of ‘Utils::join‘ to join a vector into a delimiter separated string.
In this example, a custom separator is used to join the vector.
|
1 2 3 4 5 6 7 8 9 10 11 12 13 14 15 |
// Join - String Vector // Declare data std::vector<std::string> names = { "Kenneth", "Jennifer", "Lynn", "Sole" }; // Join using custom separator std::string results = Utils::join(names.begin(), names.end(), "; "); // Display results std::cout << results; // expected output: /* Kenneth; Jennifer; Lynn; Sole */ |
3. Utils Namespace
The following is the Utils Namespace. Include this in your project to start using!
|
1 2 3 4 5 6 7 8 9 10 11 12 13 14 15 16 17 18 19 20 21 22 23 24 25 26 27 28 29 30 31 32 33 34 35 |
// ============================================================================ // Author: Kenneth Perkins // Date: Jun 5, 2021 // Taken From: http://programmingnotes.org/ // File: Utils.h // Description: Handles general utility functions // ============================================================================ #pragma once #include <string> #include <sstream> namespace Utils { /** * FUNCTION: join * USE: Concatenates elements in the given range [first, last), using the * specified separator between each item * @param first: The first position of the sequence * @param last: The last position of the sequence * @param separator: The character(s) to use as a separator. Separator is * included in the returned string only if there is more than one element * @return: A string containing the elements delimited by the separator * character, or empty if values has zero elements */ template<typename InputIt> std::string join(InputIt first, InputIt last, const std::string& separator = ",") { std::ostringstream result; if (first != last) { result << *first; while (++first != last) { result << separator << *first; } } return result.str(); } }// http://programmingnotes.org/ |
4. More Examples
Below are more examples demonstrating the use of the ‘Utils‘ Namespace. Don’t forget to include the module when running the examples!
|
1 2 3 4 5 6 7 8 9 10 11 12 13 14 15 16 17 18 19 20 21 22 23 24 25 26 27 28 29 30 31 32 33 34 35 36 37 38 39 40 41 42 43 44 45 46 47 48 49 50 |
// ============================================================================ // Author: Kenneth Perkins // Date: Jun 5, 2021 // Taken From: http://programmingnotes.org/ // File: program.cpp // Description: The following demonstrates the use of the Utils Namespace // ============================================================================ #include <iostream> #include <string> #include <exception> #include <vector> #include "Utils.h" void display(const std::string& message); int main() { try { // Declare data int arry[] = { 1987, 19, 22, 2009, 2019, 1991, 28, 31 }; // Get array size int size = sizeof(arry) / sizeof(arry[0]); // Join using default separator std::string results = Utils::join(arry, arry + size); // Display results display(results); display(""); // Declare data std::vector<std::string> names = { "Kenneth", "Jennifer", "Lynn", "Sole" }; // Join using custom separator std::string results2 = Utils::join(names.begin(), names.end(), "; "); // Display results display(results2); } catch (std::exception& e) { display("\nAn error occurred: " + std::string(e.what())); } std::cin.get(); return 0; } void display(const std::string& message) { std::cout << message << std::endl; }// http://programmingnotes.org/ |
QUICK NOTES:
The highlighted lines are sections of interest to look out for.
The code is heavily commented, so no further insight is necessary. If you have any questions, feel free to leave a comment below.
C++ || How To Replace A Letter With Its Alphabet Position Using C++

The following is a module with functions which demonstrates how to replace a letter with its alphabet position using C++.
1. Replace With Alphabet Position
The example below demonstrates the use of ‘Utils::getAlphabetPosition‘ to replace a letter with its alphabet position.
|
1 2 3 4 5 6 7 8 9 10 11 12 13 14 |
// Replace With Alphabet Position // Get alphabet position auto result = Utils::getAlphabetPosition("The sunset sets at twelve o' clock."); // Display the results for (const auto& position : result) { std::cout << position << " "; } // expected output: /* 20 8 5 19 21 14 19 5 20 19 5 20 19 1 20 20 23 5 12 22 5 15 3 12 15 3 11 */ |
2. Utils Namespace
The following is the Utils Namespace. Include this in your project to start using!
|
1 2 3 4 5 6 7 8 9 10 11 12 13 14 15 16 17 18 19 20 21 22 23 24 25 26 27 28 29 30 31 |
// ============================================================================ // Author: Kenneth Perkins // Date: Jun 3, 2021 // Taken From: http://programmingnotes.org/ // File: Utils.h // Description: Handles general utility functions // ============================================================================ #pragma once #include <cctype> #include <vector> #include <string> namespace Utils { /** * FUNCTION: getAlphabetPosition * USE: Gets the alphabet position of each character in a string * @param text: The text to get the position * @return: The alphabet position of each character */ std::vector<std::size_t> getAlphabetPosition(std::string text) { std::string alphabet = "abcdefghijklmnopqrstuvwxyz"; std::vector<std::size_t> result; for (const auto& letter : text) { auto index = alphabet.find(static_cast<unsigned char>(std::tolower(letter))); if (index != std::string::npos) { result.push_back(index + 1); } } return result; } }// http://programmingnotes.org/ |
3. More Examples
Below are more examples demonstrating the use of the ‘Utils‘ Namespace. Don’t forget to include the module when running the examples!
|
1 2 3 4 5 6 7 8 9 10 11 12 13 14 15 16 17 18 19 20 21 22 23 24 25 26 27 28 29 30 31 32 33 34 |
// ============================================================================ // Author: Kenneth Perkins // Date: Jun 3, 2021 // Taken From: http://programmingnotes.org/ // File: program.cpp // Description: The following demonstrates the use of the Utils Namespace // ============================================================================ #include <iostream> #include <string> #include <exception> #include "Utils.h" void display(const std::string& message); int main() { try { // Get alphabet position auto result = Utils::getAlphabetPosition("The sunset sets at twelve o' clock."); // Display the results for (const auto& position : result) { std::cout << position << " "; } } catch (std::exception& e) { display("\nAn error occurred: " + std::string(e.what())); } std::cin.get(); return 0; } void display(const std::string& message) { std::cout << message << std::endl; }// http://programmingnotes.org/ |
QUICK NOTES:
The highlighted lines are sections of interest to look out for.
The code is heavily commented, so no further insight is necessary. If you have any questions, feel free to leave a comment below.
C++ || Simple Palindrome Checker Using A Stack & Queue Using C++

The following is a program which demonstrates how to use a stack and a queue to test for a palindrome using C++.
The program demonstrated on this page is an updated version of a previous program of the same type. This program is great practice for understanding how the two data structures work.
REQUIRED KNOWLEDGE FOR THIS PROGRAM
Template Classes - What Are They?

Stacks

Queues

LIFO - Last In First Out

FIFO - First In First Out
1. Overview
This program first asks the user to enter in text which they wish to compare for similarity. The data is then saved into the system using the “enqueue” and “push” functions available within the queue and stack classes. After the data is obtained, a while loop is used to iterate through both classes, checking to see if the characters at each location within both classes are the same. If the text within both classes are the same, it is a palindrome.
2. Palindrome Checker
|
1 2 3 4 5 6 7 8 9 10 11 12 13 14 15 16 17 18 19 20 21 22 23 24 25 26 27 28 29 30 31 32 33 34 35 36 37 38 39 40 41 42 43 44 45 46 47 48 49 50 51 52 53 |
// ============================================================================ // Author: Kenneth Perkins // Date: Jul 22, 2012 // Updated: Apr 2, 2021 // Taken From: http://programmingnotes.org/ // File: palindrome.cpp // Description: Demonstrates a palindrome checker using a stack & queue // ============================================================================ #include <iostream> #include <cctype> #include <string> #include <queue> #include <stack> int main() { // Declare variables std::string text = ""; bool isPalindrome = true; std::queue<char> queue; std::stack<char> stack; // Get data from user std::cout << "Enter in some text to see if its a palindrome: "; std::getline(std::cin, text); // Place the characters into the queue and stack for storage for (auto ch : text) { ch = std::toupper(ch); queue.push(ch); stack.push(ch); } // Determine if the string is a palindrome while (!queue.empty() && !stack.empty()) { if (queue.front() != stack.top()) { isPalindrome = false; break; } queue.pop(); stack.pop(); } // Display results to the screen std::cout << "\n\n" << text; if (isPalindrome) { std::cout << " is a palindrome!\n"; } else { std::cout << " is NOT a palindrome..\n"; } std::cin.get(); return 0; }// http://programmingnotes.org/ |
QUICK NOTES:
The highlighted lines are sections of interest to look out for.
The code is heavily commented, so no further insight is necessary. If you have any questions, feel free to leave a comment below.
Once compiled, you should get this as your output:
====== RUN 1 ======Enter in some text to see if its a palindrome: StEP on No pETS
StEP on No pETS is a palindrome!
====== RUN 2 ======
Enter in some text to see if its a palindrome: Hello World
Hello World is NOT a palindrome..
====== RUN 3 ======
Enter in some text to see if its a palindrome: Kenneth, Jennifer, Lynn, Sole
Kenneth, Jennifer, Lynn, Sole is NOT a palindrome..
C++ || How To Sort An Array/Vector/Container With Multiple Sorting Conditions Using C++
The following is a module with functions which demonstrates how to sort an array/vector/container with multiple sorting conditions using C++.
The function demonstrated on this page is a wrapper for the std::sort function, which means it works for any container supported by std::sort.
This function accepts multiple sorting conditions (comparison functions), which allows for complex array sorting much like the SQL/LINQ ‘Order By’ operation.
1. Simple Array – Ascending
The example below demonstrates the use of Utils::sortBy to sort a simple array.
In this example, no sorting conditions are specified. In this case, the array is sorted in ascending order.
|
1 2 3 4 5 6 7 8 9 10 11 12 13 14 15 16 17 18 19 20 21 22 23 24 25 26 27 |
// Simple Array - Ascending // Declare array int arry[] = { 1987, 19, 22, 2009, 2019, 1991, 28, 31 }; // Get array size int size = sizeof(arry) / sizeof(arry[0]); // Sort array in default ascending order Utils::sortBy(arry, arry + size); // Display results for (int index = 0; index < size; ++index) { std::cout << arry[index] << std::endl; } // expected output: /* 19 22 28 31 1987 1991 2009 2019 */ |
2. Simple Array – Descending
The example below demonstrates the use of Utils::sortBy to sort a simple array.
In this example, a sorting condition (comparison function) is specified. In this case, the array is sorted in descending order.
Note: In the example below, a lambda is used, though it is not required. A regular function can be used here as well.
|
1 2 3 4 5 6 7 8 9 10 11 12 13 14 15 16 17 18 19 20 21 22 23 24 25 26 27 28 29 30 |
// Simple Array - Descending // Declare array int arry[] = { 1987, 19, 22, 2009, 2019, 1991, 28, 31 }; // Get array size int size = sizeof(arry) / sizeof(arry[0]); // Declare sort condition auto condition = [](const auto& lhs, const auto& rhs) { return lhs > rhs; }; // Sort array in descending order Utils::sortBy(arry, arry + size, condition); // Display results for (int index = 0; index < size; ++index) { std::cout << arry[index] << std::endl; } // expected output: /* 2019 2009 1991 1987 31 28 22 19 */ |
3. Object Vector – Multi Key Sort
The example below demonstrates the use of Utils::sortBy to sort an object vector.
In this example, multiple sorting conditions (comparison functions) are specified. In this case, the vector is sorted by multiple object properties.
When multiple sorting conditions are specified, the sequence is sorted in the order in which the conditions are supplied (FIFO).
Note: In the example below, lambda functions are used, though they are not required. Regular functions can be used here as well.
|
1 2 3 4 5 6 7 8 9 10 11 12 13 14 15 16 17 18 19 20 21 22 23 24 25 26 27 28 29 30 31 32 33 34 |
// Object Vector - Multi Key Sort // Declare object struct Person { int id; std::string name; }; // Declare data std::vector<Person> people = { {31, "Kenneth"}, {28, "Jennifer"}, {87, "Lynn"}, {91, "Sole"}, {22, "Kenneth"}, {19, "Jennifer"} }; // Sort vector by name length ASC, id DESC Utils::sortBy(people.begin(), people.end(), { [](const auto& lhs, const auto& rhs) { return lhs.name.length() < rhs.name.length(); }, [](const auto& lhs, const auto& rhs) { return lhs.id > rhs.id; } }); // Display results for (const auto& person : people) { std::cout << person.id << " - " << person.name << std::endl; } // expected output: /* 91 - Sole 87 - Lynn 31 - Kenneth 22 - Kenneth 28 - Jennifer 19 - Jennifer */ |
4. Utils Namespace
The following is the Utils Namespace. Include this in your project to start using!
|
1 2 3 4 5 6 7 8 9 10 11 12 13 14 15 16 17 18 19 20 21 22 23 24 25 26 27 28 29 30 31 32 33 34 35 36 37 38 39 40 41 42 43 44 45 46 47 48 49 50 51 52 53 54 55 56 57 58 59 60 61 62 63 64 65 66 67 68 69 70 71 72 73 74 75 76 77 78 79 80 81 82 83 |
// ============================================================================ // Author: Kenneth Perkins // Date: Mar 8, 2021 // Taken From: http://programmingnotes.org/ // File: Utils.h // Description: Handles general utility functions // ============================================================================ #pragma once #include <algorithm> #include <functional> #include <type_traits> #include <iterator> #include <vector> namespace Utils { /** * FUNCTION: evaluate * USE: Evaluates each sorting condition and determines the order the item should be in * @param conditions: The comparison functions by which the sequence should be sorted * @param lhs: The first element for comparison * @param rhs: The second element for comparison * @return: The sorting order of this item */ template<typename T> bool evaluate(const std::vector<std::function<bool(T, T)>>& conditions, const T& lhs, const T& rhs) { bool result = false; // Evaluate each condition based on the order they were supplied in for (const auto& condition : conditions) { // Call the comparison function to evaluate the condition if (condition(lhs, rhs)) { result = true; break; } else if (condition(rhs, lhs)) { break; } } return result; } /** * FUNCTION: sortBy * USE: Sorts a sequence in ascending or descending order depending on the sorting conditions * @param first: The first position of the sequence to be sorted * @param last: The last position of the sequence to be sorted * @param conditions: The comparison functions by which the sequence should be sorted. * Accepts multiple comparison functions. The sequence is sorted in the * order in which the conditions were placed (FIFO) * @return: N/A */ template<typename RandomIt, typename T = typename std::iterator_traits<RandomIt>::value_type> void sortBy(RandomIt first, RandomIt last, const std::vector<typename std::common_type<std::function<bool(T, T)>>::type>& conditions) { std::sort(first, last, [&](const T& lhs, const T& rhs) { return evaluate(conditions, lhs, rhs); }); } /** * FUNCTION: sortBy * USE: Sorts a sequence in ascending or descending order depending on the sorting condition * @param first: The first position of the sequence to be sorted * @param last: The last position of the sequence to be sorted * @param condition: A comparison function by which the sequence should be sorted * @return: N/A */ template<typename RandomIt, typename T = typename std::iterator_traits<RandomIt>::value_type> void sortBy(RandomIt first, RandomIt last, const typename std::common_type<std::function<bool(T, T)>>::type& condition) { std::vector<std::function<bool(T, T)>> conditions = { condition }; sortBy(first, last, conditions); } /** * FUNCTION: sortBy * USE: Sorts a sequence in ascending order * @param first: The first position of the sequence to be sorted * @param last: The last position of the sequence to be sorted * @return: N/A */ template<typename RandomIt, typename T = typename std::iterator_traits<RandomIt>::value_type> void sortBy(RandomIt first, RandomIt last) { auto condition = [](const T& lhs, const T& rhs) { return lhs < rhs; }; sortBy(first, last, condition); } }// http://programmingnotes.org/ |
5. More Examples
Below are more examples demonstrating the use of the ‘Utils‘ Namespace. Don’t forget to include the module when running the examples!
|
1 2 3 4 5 6 7 8 9 10 11 12 13 14 15 16 17 18 19 20 21 22 23 24 25 26 27 28 29 30 31 32 33 34 35 36 37 38 39 40 41 42 43 44 45 46 47 48 49 50 51 52 53 54 55 56 57 58 59 60 61 62 63 64 65 66 67 68 69 70 71 72 73 74 75 76 77 78 79 80 81 82 83 84 85 86 87 88 89 90 91 92 93 94 95 96 97 98 99 100 101 102 103 104 105 106 107 108 109 110 111 112 113 114 115 116 117 118 119 120 121 122 123 124 125 126 127 128 129 130 131 132 133 134 135 136 137 138 139 140 141 142 143 144 145 146 147 148 149 150 151 152 153 154 155 156 157 158 159 160 161 162 163 164 165 166 167 168 169 170 171 172 173 174 175 176 177 178 179 180 181 182 183 184 185 186 187 188 189 190 191 192 193 194 195 196 197 198 199 200 201 202 203 204 205 206 207 208 209 210 |
// ============================================================================ // Author: Kenneth Perkins // Date: Mar 8, 2021 // Taken From: http://programmingnotes.org/ // File: program.cpp // Description: The following demonstrates the use of the Utils Namespace // ============================================================================ #include <iostream> #include <string> #include <exception> #include <vector> #include <utility> #include "Utils.h" void display(const std::string& message); int main() { try { // Declare array int arry[] = { 1987, 19, 22, 2009, 2019, 1991, 28, 31 }; // Get array size int size = sizeof(arry) / sizeof(arry[0]); // Sort array in default ascending order Utils::sortBy(arry, arry + size); // Display results for (int index = 0; index < size; ++index) { std::cout << arry[index] << std::endl; } display(""); // Declare sort condition auto condition = [](const auto& lhs, const auto& rhs) { return lhs > rhs; }; // Sort array in descending order Utils::sortBy(arry, arry + size, condition); // Display results for (int index = 0; index < size; ++index) { std::cout << arry[index] << std::endl; } display(""); // Declare object struct Person { int id; std::string name; }; // Declare data std::vector<Person> people = { {31, "Kenneth"}, {28, "Jennifer"}, {87, "Lynn"}, {91, "Sole"}, {22, "Kenneth"}, {19, "Jennifer"} }; // Sort vector by name length ASC, id DESC Utils::sortBy(people.begin(), people.end(), { [](const auto& lhs, const auto& rhs) { return lhs.name.length() < rhs.name.length(); }, [](const auto& lhs, const auto& rhs) { return lhs.id > rhs.id; } }); // Display results for (const auto& person : people) { std::cout << person.id << " - " << person.name << std::endl; } display(""); struct Student { std::string name; // Given int math; // Marks in math (Given) int phy; // Marks in Physics (Given) int che; // Marks in Chemistry (Given) int total; // Total marks (To be filled) int rank; // Rank of student (To be filled) }; const int n = 5; // array of structure objects Student a[n]; // Details of Student 1 a[0].name = "Bryan"; a[0].math = 80; a[0].phy = 95; a[0].che = 85; // Details of Student 2 a[1].name = "Kevin"; a[1].math = 95; a[1].phy = 85; a[1].che = 99; // Details of Student 3 a[2].name = "Nicky"; a[2].math = 95; a[2].phy = 85; a[2].che = 80; // Details of Student 4 a[3].name = "Steve"; a[3].math = 80; a[3].phy = 70; a[3].che = 90; // Details of Student 5 a[4].name = "Rohan"; a[4].math = 80; a[4].phy = 80; a[4].che = 80; for (int i = 0; i < n; i++) a[i].total = a[i].math + a[i].phy + a[i].che; Utils::sortBy(a, a + n, { [](const auto& lhs, const auto& rhs) { return lhs.math > rhs.math; }, [](const auto& lhs, const auto& rhs) { return lhs.phy > rhs.phy; }, [](const auto& lhs, const auto& rhs) { return lhs.che > rhs.che; } }); for (int i = 0; i < n; i++) a[i].rank = i + 1; // Column names for displaying data std::cout << "Rank" << " " << "Name" << " "; std::cout << "Maths" << " " << "Physics" << " " << "Chemistry"; std::cout << " " << "Total\n"; // Display details of Students for (int i = 0; i < n; i++) { std::cout << a[i].rank << " "; std::cout << a[i].name << " "; std::cout << a[i].math << " " << a[i].phy << " " << a[i].che << " "; std::cout << a[i].total << " "; std::cout << "\n"; } using my_pair = std::pair<double, double>; std::vector<my_pair> data; data.push_back(my_pair(3, 2)); data.push_back(my_pair(1, 2)); data.push_back(my_pair(1, 1)); data.push_back(my_pair(2, 2)); Utils::sortBy(data.begin(), data.end(), { [](const auto& lhs, const auto& rhs) { return lhs.first < rhs.first; }, [](const auto& lhs, const auto& rhs) { return lhs.second > rhs.second; } }); display(""); for (const auto& p : data) { std::cout << p.first << ' ' << p.second << std::endl; } display(""); struct Node { int x; int y; float value; }; std::vector<Node> vec{ {5, 6, 0.f}, {2, 4, 0.f}, {1, 1, 0.f}, {1, 0, 0.f}, {8, 10, 0.f}, {4, 7, 0.f}, {7, 1, 0.f}, {5, 4, 0.f}, {6, 1, 0.f}, {1, 4, 0.f}, {3, 10, 0.f}, {7, 2, 0.f} }; Utils::sortBy(vec.begin(), vec.end(), { [](const Node& lhs, const Node& rhs) { return lhs.y < rhs.y; }, [](const Node& lhs, const Node& rhs) { return lhs.x < rhs.x; } }); std::cout << "x y" << std::endl << std::endl; for (const auto& item : vec) { std::cout << item.x << " " << item.y << std::endl; } } catch (std::exception& e) { display("\nAn error occurred: " + std::string(e.what())); } std::cin.get(); return 0; } void display(const std::string& message) { std::cout << message << std::endl; }// http://programmingnotes.org/ |
QUICK NOTES:
The highlighted lines are sections of interest to look out for.
The code is heavily commented, so no further insight is necessary. If you have any questions, feel free to leave a comment below.
C++ || How To Get The Next & Previous Multiple Of A Number Using C++

The following is a module with functions which demonstrates how to get the next and previous multiple of a number using C++.
If a number is already a multiple, there is a parameter that allows you to specify if it should be rounded or not.
Click here for sample code demonstrating how to round a number by a specific amount.
1. Get Next Multiple – Include Existing
The example below demonstrates how to round up a number to the next multiple. In this example, if a number is already a multiple, it will not be rounded up to the next multiple.
|
1 2 3 4 5 6 7 8 9 10 11 12 13 14 15 16 17 18 19 20 21 22 |
// Get next multiple - include if already a multiple. int multiple = 5; for (int index = 1; index <= 10; ++index) { std::cout << index << " => " << Utils::getNextMultiple(index, multiple) << std::endl; } // expected output: /* 1 => 5 2 => 5 3 => 5 4 => 5 5 => 5 6 => 10 7 => 10 8 => 10 9 => 10 10 => 10 */ |
2. Get Next Multiple – Skip Existing
The example below demonstrates how to round up a number to the next multiple. In this example, if a number is already a multiple, it will be rounded up to the next multiple.
|
1 2 3 4 5 6 7 8 9 10 11 12 13 14 15 16 17 18 19 20 21 22 23 24 |
// Get next multiple - skip if already a multiple. int multiple = 5; // Set 3rd parameter to true to skip numbers that are already a // multiple to the next value for (int index = 1; index <= 10; ++index) { std::cout << index << " => " << Utils::getNextMultiple(index, multiple, true) << std::endl; } // expected output: /* 1 => 5 2 => 5 3 => 5 4 => 5 5 => 10 6 => 10 7 => 10 8 => 10 9 => 10 10 => 15 */ |
3. Get Previous Multiple – Include Existing
The example below demonstrates how to round down a number to the previous multiple. In this example, if a number is already a multiple, it will not be rounded down to the previous multiple.
|
1 2 3 4 5 6 7 8 9 10 11 12 13 14 15 16 17 18 19 20 21 22 |
// Get previous multiple - include if already a multiple. int multiple = 5; for (int index = 10; index >= 1; --index) { std::cout << index << " => " << Utils::getPreviousMultiple(index, multiple) << std::endl; } // expected output: /* 10 => 10 9 => 5 8 => 5 7 => 5 6 => 5 5 => 5 4 => 0 3 => 0 2 => 0 1 => 0 */ |
4. Get Previous Multiple – Skip Existing
The example below demonstrates how to round down a number to the previous multiple. In this example, if a number is already a multiple, it will be rounded down to the previous multiple.
|
1 2 3 4 5 6 7 8 9 10 11 12 13 14 15 16 17 18 19 20 21 22 23 24 |
// Get previous multiple - skip if already a multiple. int multiple = 5; // Set 3rd parameter to true to skip numbers that are already a // multiple to the previous value for (int index = 10; index >= 1; --index) { std::cout << index << " => " << Utils::getPreviousMultiple(index, multiple, true) << std::endl; } // expected output: /* 10 => 5 9 => 5 8 => 5 7 => 5 6 => 5 5 => 0 4 => 0 3 => 0 2 => 0 1 => 0 */ |
5. Utils Namespace
The following is the Utils.js Namespace. Include this in your project to start using!
|
1 2 3 4 5 6 7 8 9 10 11 12 13 14 15 16 17 18 19 20 21 22 23 24 25 26 27 28 29 30 31 32 33 34 35 36 37 38 39 40 41 42 43 44 45 46 47 48 49 50 |
// ============================================================================ // Author: Kenneth Perkins // Date: Mar 3, 2021 // Taken From: http://programmingnotes.org/ // File: Utils.h // Description: Handles general utility functions // ============================================================================ #pragma once #include <cmath> namespace Utils { /** * FUNCTION: getNextMultiple * USE: Returns the next multiple of a given number. Unless specified, * it will not round up numbers which are already multiples * @param number: The given number to find the next multiple * @param multiple: The multiple number * @param skipAlreadyMultiple: Boolean that specifies if input numbers which * are already multiples should be skipped to the next multiple or not * @return: The next multiple of the given number */ int getNextMultiple(int number, int multiple, bool skipAlreadyMultiple = false) { int result = 0; if (multiple != 0) { int remainder = (std::abs(number) % multiple); if (!skipAlreadyMultiple && remainder == 0) { result = number; } else if (number < 0 && remainder != 0) { result = -(std::abs(number) - remainder); } else { result = number + (multiple - remainder); } } return result; } /** * FUNCTION: getPreviousMultiple * USE: Returns the previous multiple of a given number. Unless specified, * it will not round down numbers which are already multiples * @param number: The given number to find the previous multiple * @param multiple: The multiple number * @param skipAlreadyMultiple: Boolean that specifies if input numbers which * are already multiples should be skipped to the previous multiple or not * @return: The previous multiple of the given number */ int getPreviousMultiple(int number, int multiple, bool skipAlreadyMultiple = false) { return getNextMultiple(number, multiple, !skipAlreadyMultiple) - multiple; } }// http://programmingnotes.org/ |
6. More Examples
Below are more examples demonstrating the use of the ‘Utils‘ Namespace. Don’t forget to include the module when running the examples!
|
1 2 3 4 5 6 7 8 9 10 11 12 13 14 15 16 17 18 19 20 21 22 23 24 25 26 27 28 29 30 31 32 33 34 35 36 37 38 39 40 41 42 43 44 45 46 47 48 49 50 51 52 53 54 55 56 57 58 |
// ============================================================================ // Author: Kenneth Perkins // Date: Mar 3, 2021 // Taken From: http://programmingnotes.org/ // File: program.cpp // Description: The following demonstrates the use of the Utils Namespace // ============================================================================ #include <iostream> #include <string> #include <exception> #include "Utils.h" void display(const std::string& message); int main() { try { int multiple = 5; for (int index = 1; index <= 10; ++index) { std::cout << index << " => " << Utils::getNextMultiple(index, multiple) << std::endl; } display(""); // Set 3rd parameter to true to skip numbers that are already a // multiple to the next value for (int index = 1; index <= 10; ++index) { std::cout << index << " => " << Utils::getNextMultiple(index, multiple, true) << std::endl; } display(""); for (int index = 10; index >= 1; --index) { std::cout << index << " => " << Utils::getPreviousMultiple(index, multiple) << std::endl; } display(""); // Set 3rd parameter to true to skip numbers that are already a // multiple to the previous value for (int index = 10; index >= 1; --index) { std::cout << index << " => " << Utils::getPreviousMultiple(index, multiple, true) << std::endl; } } catch (std::exception& e) { display("\nAn error occurred: " + std::string(e.what())); } std::cin.get(); return 0; } void display(const std::string& message) { std::cout << message << std::endl; }// http://programmingnotes.org/ |
QUICK NOTES:
The highlighted lines are sections of interest to look out for.
The code is heavily commented, so no further insight is necessary. If you have any questions, feel free to leave a comment below.
C++ || How To Round A Number To The Nearest X Using C++

The following is a module with functions which demonstrates how to round a number to the nearest X using C++.
This function has the ability to either round a number to the nearest amount, always round up, or always round down. For example, when dealing with money, this is good for rounding a dollar amount to the nearest 5 cents.
This function can be used to round a number up or down by any step amount.
1. Round – Nearest
The example below demonstrates the use of ‘Utils::roundAmount‘ to round a number to the nearest 5 cents.
The optional function parameter determines they type of rounding to perform.
|
1 2 3 4 5 6 7 8 9 10 11 12 13 14 15 16 17 18 19 20 21 22 |
// Round - Nearest // Declare values to round double values[] = { 19.28, 31.22, 19.91, 19.87, 0.05 }; // Declare step amount double stepAmount = 0.05; // Round to nearest amount for (const auto& value : values) { std::cout << "Value: " << value << ", Rounded: " << Utils::roundAmount(value, stepAmount) << std::endl; } // expected output: /* Value: 19.28, Rounded: 19.3 Value: 31.22, Rounded: 31.2 Value: 19.91, Rounded: 19.9 Value: 19.87, Rounded: 19.85 Value: 0.05, Rounded: 0.05 */ |
2. Round – Up
The example below demonstrates the use of ‘Utils::roundAmount‘ to always round a number up to the nearest 5 cents.
The optional function parameter determines they type of rounding to perform.
|
1 2 3 4 5 6 7 8 9 10 11 12 13 14 15 16 17 18 19 20 21 22 |
// Round - Up // Declare values to round double values[] = { 19.28, 31.22, 19.91, 19.87, 0.05 }; // Declare step amount double stepAmount = 0.05; // Round up to nearest amount for (const auto& value : values) { std::cout << "Value: " << value << ", Rounded: " << Utils::roundAmount(value, stepAmount, Utils::RoundType::Up) << std::endl; } // expected output: /* Value: 19.28, Rounded: 19.3 Value: 31.22, Rounded: 31.25 Value: 19.91, Rounded: 19.95 Value: 19.87, Rounded: 19.9 Value: 0.05, Rounded: 0.05 */ |
3. Round – Down
The example below demonstrates the use of ‘Utils::roundAmount‘ to always round a number down to the nearest 5 cents.
The optional function parameter determines they type of rounding to perform.
|
1 2 3 4 5 6 7 8 9 10 11 12 13 14 15 16 17 18 19 20 21 22 |
// Round - Down // Declare values to round double values[] = { 19.28, 31.22, 19.91, 19.87, 0.05 }; // Declare step amount double stepAmount = 0.05; // Round down to nearest amount for (const auto& value : values) { std::cout << "Value: " << value << ", Rounded: " << Utils::roundAmount(value, stepAmount, Utils::RoundType::Down) << std::endl; } // expected output: /* Value: 19.28, Rounded: 19.25 Value: 31.22, Rounded: 31.2 Value: 19.91, Rounded: 19.9 Value: 19.87, Rounded: 19.85 Value: 0.05, Rounded: 0.05 */ |
4. Utils Namespace
The following is the Utils Namespace. Include this in your project to start using!
|
1 2 3 4 5 6 7 8 9 10 11 12 13 14 15 16 17 18 19 20 21 22 23 24 25 26 27 28 29 30 31 32 33 34 35 36 37 38 39 40 41 42 43 44 45 46 47 48 |
// ============================================================================ // Author: Kenneth Perkins // Date: Feb 25, 2021 // Taken From: http://programmingnotes.org/ // File: Utils.h // Description: Handles general utility functions // ============================================================================ #pragma once #include <cmath> #include <stdexcept> #include <string> namespace Utils { enum RoundType { Nearest, Up, Down }; /** * FUNCTION: roundAmount * USE: Rounds a number to the nearest X * @param value: The value to round * @param stepAmount: The amount to round the value by * @param type: The type of rounding to perform * @return: The value rounded by the step amount and type */ double roundAmount(double value, double stepAmount, RoundType type = RoundType::Nearest) { double inverse = 1 / stepAmount; double dividend = value * inverse; switch (type) { case RoundType::Nearest: dividend = std::round(dividend); break; case RoundType::Up: dividend = std::ceil(dividend); break; case RoundType::Down: dividend = std::floor(dividend); break; default: throw std::invalid_argument{ "Unknown type: '" + std::to_string(type) + "'" }; break; } double result = dividend / inverse; return result; } }// http://programmingnotes.org/ |
5. More Examples
Below are more examples demonstrating the use of the ‘Utils‘ Namespace. Don’t forget to include the module when running the examples!
|
1 2 3 4 5 6 7 8 9 10 11 12 13 14 15 16 17 18 19 20 21 22 23 24 25 26 27 28 29 30 31 32 33 34 35 36 37 38 39 40 41 42 43 44 45 46 47 48 49 50 51 52 53 54 |
// ============================================================================ // Author: Kenneth Perkins // Date: Feb 25, 2021 // Taken From: http://programmingnotes.org/ // File: program.cpp // Description: The following demonstrates the use of the Utils Namespace // ============================================================================ #include <iostream> #include <string> #include <exception> #include "Utils.h" void display(const std::string& message); int main() { try { // Declare values to round double values[] = { 19.28, 31.22, 19.91, 19.87, 0.05 }; // Declare step amount double stepAmount = 0.05; // Round to nearest amount for (const auto& value : values) { std::cout << "Value: " << value << ", Rounded: " << Utils::roundAmount(value, stepAmount) << std::endl; } display(""); // Round up to nearest amount for (const auto& value : values) { std::cout << "Value: " << value << ", Rounded: " << Utils::roundAmount(value, stepAmount, Utils::RoundType::Up) << std::endl; } display(""); // Round down to nearest amount for (const auto& value : values) { std::cout << "Value: " << value << ", Rounded: " << Utils::roundAmount(value, stepAmount, Utils::RoundType::Down) << std::endl; } } catch (std::exception& e) { display("\nAn error occurred: " + std::string(e.what())); } std::cin.get(); return 0; } void display(const std::string& message) { std::cout << message << std::endl; }// http://programmingnotes.org/ |
QUICK NOTES:
The highlighted lines are sections of interest to look out for.
The code is heavily commented, so no further insight is necessary. If you have any questions, feel free to leave a comment below.
C++ || How To Split & Batch An Array/Vector/Container Into Smaller Sub-Lists Of N Size Using C++
The following is a module with functions which demonstrates how to split/batch an array/vector/container into smaller sublists of n size using C++.
The function demonstrated on this page is a template, so it should work on containers of any type. It uses a simple for loop to group items into batches.
1. Partition – Integer Array
The example below demonstrates the use of ‘Utils::partition‘ to group an integer array into batches.
|
1 2 3 4 5 6 7 8 9 10 11 12 13 14 15 16 17 18 19 20 21 22 23 24 25 26 27 28 29 30 31 32 33 34 35 |
// Partition - Integer Array // Declare numbers int numbers[] = { 1987, 19, 22, 2009, 2019, 1991, 28, 31 }; // Get array size int size = sizeof(numbers) / sizeof(numbers[0]); // Split into sub groups auto numbersPartition = Utils::partition(numbers, numbers + size, 3); // Display grouped batches for (unsigned batchCount = 0; batchCount < numbersPartition.size(); ++batchCount) { auto batch = numbersPartition[batchCount]; std::cout << "Batch #" << batchCount + 1 << std::endl; for (const auto& item : batch) { std::cout << " Item: " << item << std::endl; } } // expected output: /* Batch #1 Item: 1987 Item: 19 Item: 22 Batch #2 Item: 2009 Item: 2019 Item: 1991 Batch #3 Item: 28 Item: 31 */ |
2. Partition – String Vector
The example below demonstrates the use of ‘Utils::partition‘ to group a string vector into batches.
|
1 2 3 4 5 6 7 8 9 10 11 12 13 14 15 16 17 18 19 20 21 22 23 24 25 26 27 |
// Partition - String Vector // Declare data std::vector<std::string> names = { "Kenneth", "Jennifer", "Lynn", "Sole" }; // Split into sub groups auto namesPartition = Utils::partition(names.begin(), names.end(), 2); // Display grouped batches for (unsigned batchCount = 0; batchCount < namesPartition.size(); ++batchCount) { auto batch = namesPartition[batchCount]; std::cout << "Batch #" << batchCount + 1 << std::endl; for (const auto& item : batch) { std::cout << " Item: " << item << std::endl; } } // expected output: /* Batch #1 Item: Kenneth Item: Jennifer Batch #2 Item: Lynn Item: Sole */ |
3. Partition – Custom Object Vector
The example below demonstrates the use of ‘Utils::partition‘ to group a custom object vector into batches.
|
1 2 3 4 5 6 7 8 9 10 11 12 13 14 15 16 17 18 19 20 21 22 23 24 25 26 27 28 29 30 31 32 33 34 35 36 37 38 |
// Partition - Custom Object Vector // Declare object struct Person { int id; std::string name; }; // Declare data std::vector<Person> people = { {31, "Kenneth"}, {28, "Jennifer"}, {87, "Lynn"}, {91, "Sole"}, {22, "Kenneth"}, {19, "Jennifer"} }; // Split into sub groups auto peoplePartition = Utils::partition(people.begin(), people.end(), 4); // Display grouped batches for (unsigned batchCount = 0; batchCount < peoplePartition.size(); ++batchCount) { auto batch = peoplePartition[batchCount]; std::cout << "Batch #" << batchCount + 1 << std::endl; for (const auto& item : batch) { std::cout << " Item: " << item.id << " - " << item.name << std::endl; } } // expected output: /* Batch #1 Item: 31 - Kenneth Item: 28 - Jennifer Item: 87 - Lynn Item: 91 - Sole Batch #2 Item: 22 - Kenneth Item: 19 - Jennifer */ |
4. Utils Namespace
The following is the Utils Namespace. Include this in your project to start using!
|
1 2 3 4 5 6 7 8 9 10 11 12 13 14 15 16 17 18 19 20 21 22 23 24 25 26 27 28 29 30 31 32 33 34 35 36 |
// ============================================================================ // Author: Kenneth Perkins // Date: Feb 24, 2021 // Taken From: http://programmingnotes.org/ // File: Utils.h // Description: Handles general utility functions // ============================================================================ #pragma once #include <vector> #include <iterator> namespace Utils { /** * FUNCTION: partition * USE: Breaks a sequence into smaller sub-lists of a specified size * in the given range [first, last) * @param first: The first position of the sequence * @param last: The last position of the sequence * @param size: The maximum size of each sub-list * @return: A container of the smaller sub-lists of the specified size */ template<typename InputIt, typename T = typename std::iterator_traits<InputIt>::value_type> std::vector<std::vector<T>> partition(InputIt first, InputIt last, unsigned size) { std::vector<std::vector<T>> result; std::vector<T>* batch{}; for (unsigned index = 0, row = 0; first != last; ++first, ++index) { if ((index % size) == 0) { result.resize(++row); batch = &result.back(); batch->reserve(size); } batch->push_back(*first); } return result; } }// http://programmingnotes.org/ |
5. More Examples
Below are more examples demonstrating the use of the ‘Utils‘ Namespace. Don’t forget to include the module when running the examples!
|
1 2 3 4 5 6 7 8 9 10 11 12 13 14 15 16 17 18 19 20 21 22 23 24 25 26 27 28 29 30 31 32 33 34 35 36 37 38 39 40 41 42 43 44 45 46 47 48 49 50 51 52 53 54 55 56 57 58 59 60 61 62 63 64 65 66 67 68 69 70 71 72 73 74 75 76 77 78 79 80 81 82 83 84 85 86 87 88 |
// ============================================================================ // Author: Kenneth Perkins // Date: Feb 24, 2021 // Taken From: http://programmingnotes.org/ // File: program.cpp // Description: The following demonstrates the use of the Utils Namespace // ============================================================================ #include <iostream> #include <string> #include <exception> #include <vector> #include "Utils.h" // Declare object struct Person { int id; std::string name; }; void display(const std::string& message); int main() { try { // Declare numbers int numbers[] = { 1987, 19, 22, 2009, 2019, 1991, 28, 31 }; // Get array size int size = sizeof(numbers) / sizeof(numbers[0]); // Split into sub groups auto numbersPartition = Utils::partition(numbers, numbers + size, 3); // Display grouped batches for (unsigned batchCount = 0; batchCount < numbersPartition.size(); ++batchCount) { auto batch = numbersPartition[batchCount]; std::cout << "Batch #" << batchCount + 1 << std::endl; for (const auto& item : batch) { std::cout << " Item: " << item << std::endl; } } display(""); // Declare data std::vector<std::string> names = { "Kenneth", "Jennifer", "Lynn", "Sole" }; // Split into sub groups auto namesPartition = Utils::partition(names.begin(), names.end(), 2); // Display grouped batches for (unsigned batchCount = 0; batchCount < namesPartition.size(); ++batchCount) { auto batch = namesPartition[batchCount]; std::cout << "Batch #" << batchCount + 1 << std::endl; for (const auto& item : batch) { std::cout << " Item: " << item << std::endl; } } display(""); // Declare data std::vector<Person> people = { {31, "Kenneth"}, {28, "Jennifer"}, {87, "Lynn"}, {91, "Sole"}, {22, "Kenneth"}, {19, "Jennifer"} }; // Split into sub groups auto peoplePartition = Utils::partition(people.begin(), people.end(), 4); // Display grouped batches for (unsigned batchCount = 0; batchCount < peoplePartition.size(); ++batchCount) { auto batch = peoplePartition[batchCount]; std::cout << "Batch #" << batchCount + 1 << std::endl; for (const auto& item : batch) { std::cout << " Item: " << item.id << " - " << item.name << std::endl; } } } catch (std::exception& e) { display("\nAn error occurred: " + std::string(e.what())); } std::cin.get(); return 0; } void display(const std::string& message) { std::cout << message << std::endl; }// http://programmingnotes.org/ |
QUICK NOTES:
The highlighted lines are sections of interest to look out for.
The code is heavily commented, so no further insight is necessary. If you have any questions, feel free to leave a comment below.
C++ || How To Shuffle & Randomize An Array/Vector/Container Using C++
The following is a module with functions which demonstrates how to randomize and shuffle the contents of an array/vector/container using C++.
The following template function is a wrapper for the std::shuffle function.
1. Shuffle – Integer Array
The example below demonstrates the use of ‘Utils::shuffle‘ to randomize an integer array.
|
1 2 3 4 5 6 7 8 9 10 11 12 13 14 15 16 17 18 19 20 21 22 23 24 25 26 27 |
// Shuffle - Integer Array // Declare numbers int numbers[] = { 1987, 19, 22, 2009, 2019, 1991, 28, 31 }; // Get array size int size = sizeof(numbers) / sizeof(numbers[0]); // Get results Utils::shuffle(numbers, numbers + size); // Display results for (const auto& item : numbers) { std::cout << item << std::endl; } // example output: /* 28 1991 22 1987 19 2019 2009 31 */ |
2. Shuffle – String Vector
The example below demonstrates the use of ‘Utils::shuffle‘ to randomize a string vector.
|
1 2 3 4 5 6 7 8 9 10 11 12 13 14 15 16 17 18 19 20 |
// Shuffle - String Vector // Declare names std::vector<std::string> names = { "Kenneth", "Jennifer", "Lynn", "Sole" }; // Get results Utils::shuffle(names.begin(), names.end()); // Display results for (const auto& item : names) { std::cout << item << std::endl; } // example output: /* Jennifer Sole Kenneth Lynn */ |
3. Shuffle – Custom Object Vector
The example below demonstrates the use of ‘Utils::shuffle‘ to randomize a custom object vector.
|
1 2 3 4 5 6 7 8 9 10 11 12 13 14 15 16 17 18 19 20 21 22 23 24 25 26 27 28 29 30 31 |
// Shuffle - Custom Object Vector // Declare object struct Person { int id; std::string name; }; // Declare names std::vector<Person> people = { {31, "Kenneth"}, {28, "Jennifer"}, {87, "Lynn"}, {91, "Sole"}, {22, "Kenneth"}, {19, "Jennifer"} }; // Get results Utils::shuffle(people.begin(), people.end()); // Display results for (const auto& item : people) { std::cout << item.id << " - " << item.name << std::endl; } // example output: /* 28 - Jennifer 19 - Jennifer 22 - Kenneth 87 - Lynn 91 - Sole 31 - Kenneth */ |
4. Utils Namespace
The following is the Utils Namespace. Include this in your project to start using!
|
1 2 3 4 5 6 7 8 9 10 11 12 13 14 15 16 17 18 19 20 21 22 23 24 25 26 27 28 29 |
// ============================================================================ // Author: Kenneth Perkins // Date: Feb 9, 2021 // Taken From: http://programmingnotes.org/ // File: Utils.h // Description: Handles general utility functions // ============================================================================ #pragma once #include <random> #include <chrono> #include <algorithm> namespace Utils { /** * FUNCTION: shuffle * USE: Shuffles a collection in the given range [first, last) * @param first: The first position of the sequence to be sorted * @param last: The last position of the sequence to be sorted * @return: N/A */ template<typename RandomIt> void shuffle(RandomIt first, RandomIt last) { auto seed = static_cast<std::mt19937::result_type> ( std::chrono::system_clock::now().time_since_epoch().count() ); std::mt19937 generator(seed); std::shuffle(first, last, generator); } }// http://programmingnotes.org/ |
5. More Examples
Below are more examples demonstrating the use of the ‘Utils‘ Namespace. Don’t forget to include the module when running the examples!
|
1 2 3 4 5 6 7 8 9 10 11 12 13 14 15 16 17 18 19 20 21 22 23 24 25 26 27 28 29 30 31 32 33 34 35 36 37 38 39 40 41 42 43 44 45 46 47 48 49 50 51 52 53 54 55 56 57 58 59 60 61 62 63 64 65 66 67 68 69 70 71 72 73 74 75 76 |
// ============================================================================ // Author: Kenneth Perkins // Date: Feb 9, 2021 // Taken From: http://programmingnotes.org/ // File: program.cpp // Description: The following demonstrates the use of the Utils Namespace // ============================================================================ #include <iostream> #include <string> #include <exception> #include <vector> #include "Utils.h" void display(const std::string& message); // Declare object struct Person { int id; std::string name; }; int main() { try { // Declare numbers int numbers[] = { 1987, 19, 22, 2009, 2019, 1991, 28, 31 }; // Get array size int size = sizeof(numbers) / sizeof(numbers[0]); // Get results Utils::shuffle(numbers, numbers + size); // Display results for (const auto& item : numbers) { std::cout << item << std::endl; } display(""); // Declare names std::vector<std::string> names = { "Kenneth", "Jennifer", "Lynn", "Sole" }; // Get results Utils::shuffle(names.begin(), names.end()); // Display results for (const auto& item : names) { std::cout << item << std::endl; } display(""); // Declare names std::vector<Person> people = { {31, "Kenneth"}, {28, "Jennifer"}, {87, "Lynn"}, {91, "Sole"}, {22, "Kenneth"}, {19, "Jennifer"} }; // Get results Utils::shuffle(people.begin(), people.end()); // Display results for (const auto& item : people) { std::cout << item.id << " - " << item.name << std::endl; } } catch (std::exception& e) { display("\nAn error occurred: " + std::string(e.what())); } std::cin.get(); return 0; } void display(const std::string& message) { std::cout << message << std::endl; }// http://programmingnotes.org/ |
QUICK NOTES:
The highlighted lines are sections of interest to look out for.
The code is heavily commented, so no further insight is necessary. If you have any questions, feel free to leave a comment below.
C++ || How To Find The Day Of The Week You Were Born Using C++

The following is a program which demonstrates how to find the day of week you were born using C++.
The program demonstrated on this page is an updated version of a previous program of the same type.
REQUIRED KNOWLEDGE FOR THIS PROGRAM
1. Overview
This program prompts the user for their name, date of birth (month, day, year), and then displays information back to them via cout. Once the program obtains selected information from the user, it will use simple math to determine the day of the week in which the user was born, and determine the day of the week their current birthday will be for the current calendar year. The program will also display to the user their current age, along with re-displaying their name back to them.
2. When Were You Born?
Note: This program uses functions in a custom .h header file #include “Utils.h”. To obtain the code for that file, click here.
|
1 2 3 4 5 6 7 8 9 10 11 12 13 14 15 16 17 18 19 20 21 22 23 24 25 26 27 28 29 30 31 32 33 34 35 36 37 38 39 40 41 42 43 44 45 46 47 48 49 50 51 52 53 54 55 56 57 58 59 60 61 62 63 64 65 66 67 68 69 70 71 72 73 74 75 76 77 78 79 80 81 82 83 84 85 86 87 88 89 90 91 92 93 94 95 |
// ============================================================================ // Author: Kenneth Perkins // Date: Dec 12, 2012 // Updated: Feb 6, 2021 // Taken From: http://programmingnotes.org/ // File: dateOfWeek.cpp // Description: Simple program to determine the day of week for a date // ============================================================================ #include <iostream> #include <string> #include <exception> #include "Utils.h" // Function prototypes std::string getMonthName(int month); void validate(int value, int lower, int upper, const std::string& desc); // A const variable containing the current year const int CURRENT_YEAR = 2021; int main() { try { // Declare variables std::string userName = ""; int month = 0; int day = 0; int year = 0; // Get user input std::cout << "Please enter your name: "; std::getline(std::cin, userName); // Get month born std::cout << "\nPlease enter the month in which you were born (between 1 and 12): "; std::cin >> month; // Validate correct month range validate(month, 1, 12, "month"); // Get day born std::cout << "\nPlease enter the day you were born (between 1 and 31): "; std::cin >> day; // Validate correct birth date range validate(day, 1, 31, "birth date"); // Get year born std::cout << "\nPlease enter the year you were born: "; std::cin >> year; // Get the month name auto monthName = getMonthName(month); // Get the week name auto weekdayName = Utils::getWeekdayName(day, month, year); // display data to user std::cout << "\nHello " << userName << ". Here are some facts about you!" << std::endl; std::cout << "You were born " << monthName << " " << day << " " << year << std::endl; std::cout << "Your birth took place on a " << weekdayName << std::endl; std::cout << "This year (" << CURRENT_YEAR << ") your birthday will take place on a " << Utils::getWeekdayName(day, month, CURRENT_YEAR) << std::endl; std::cout << "You currently are, or will be " << (CURRENT_YEAR - year) << " years old this year!" << std::endl; } catch (std::exception& e) { std::cout << "\nAn error occurred: " + std::string(e.what()) << std::endl; } std::cin.get(); return 0; } /** * FUNCTION: getMonthName * USE: Returns the name of the month for the given paremeters * (i.e month #1 = January) * @param month: The month * @return: The name of the month for the given parameters */ std::string getMonthName(int month) { std::string months[] = {"January", "February", "March", "April", "May", "June", "July", "August", "September", "October", "November", "December"}; return months[month - 1]; } void validate(int value, int lower, int upper, const std::string& desc) { if (value < lower || value > upper) { throw std::invalid_argument{ "Invalid " + desc + " entered: '" + std::to_string(value) + "'" }; } }// http://programmingnotes.org/ |
QUICK NOTES:
The highlighted lines are sections of interest to look out for.
The code is heavily commented, so no further insight is necessary. If you have any questions, feel free to leave a comment below.
Once compiled, you should get this as your output:
Note: The code was compiled four separate times to display the different outputs its able to produce
Please enter your name: My Programming Notes

Please enter the month in which you were born (between 1 and 12): 1

Please enter the day you were born (between 1 and 31): 1

Please enter the year you were born: 2012
Hello My Programming Notes. Here are some facts about you!
You were born January 1 2012
Your birth took place on a Sunday
This year (2021) your birthday will take place on a Friday
You currently are, or will be 9 years old this year!---------------------------------------------------------------------
Please enter your name: Jennifer
Please enter the month in which you were born (between 1 and 12): 1
Please enter the day you were born (between 1 and 31): 27
Please enter the year you were born: 1991Hello Jennifer. Here are some facts about you!
You were born January 27 1991
Your birth took place on a Sunday
This year (2021) your birthday will take place on a Wednesday
You currently are, or will be 30 years old this year!---------------------------------------------------------------------
Please enter your name: Kenneth
Please enter the month in which you were born (between 1 and 12): 7
Please enter the day you were born (between 1 and 31): 28
Please enter the year you were born: 1987Hello Kenneth. Here are some facts about you!
You were born July 28 1987
Your birth took place on a Tuesday
This year (2021) your birthday will take place on a Wednesday
You currently are, or will be 34 years old this year!---------------------------------------------------------------------
Please enter your name: Name
Please enter the month in which you were born (between 1 and 12): 12
Please enter the day you were born (between 1 and 31): 35
An error occurred: Invalid birth date entered: '35'
C++ || How To Get The Day Of The Week & The Week Day Name From A Date Using C++
The following is a module with functions which demonstrates how to get the day of the week and the week day name from a given date using C++.
The function demonstrated on this page uses Zeller’s congruence to determine the day of the week from a given date.
1. Week Day
The example below demonstrates the use of ‘Utils::getWeekday‘ to get the day of week for a given date. The following function returns a value from a DayOfWeek enum, which represents the day of the week for the given parameters.
The following are possible values that are returned from this function:
• 0 = Sunday

• 1 = Monday

• 2 = Tuesday

• 3 = Wednesday

• 4 = Thursday

• 5 = Friday

• 6 = Saturday
|
1 2 3 4 5 6 7 8 9 10 11 12 13 14 15 16 17 18 19 20 21 22 |
// Week Day // Declare data int day = 27; int month = 1; int year = 1991; std::cout << "Day = " << day << ", Month = " << month << ", Year = " << year << std::endl; // Get the weekday auto weekday = Utils::getWeekday(day, month, year); // Display result std::cout << "Weekday = " << weekday << std::endl; // expected output: /* Day = 27, Month = 1, Year = 1991 Weekday = 0 */ |
2. Week Day Name
The example below demonstrates the use of ‘Utils::getWeekdayName‘ to get the name of the day of week for the given date.
The following are possible values that are returned from this function:
• Sunday

• Monday

• Tuesday

• Wednesday

• Thursday

• Friday

• Saturday
|
1 2 3 4 5 6 7 8 9 10 11 12 13 14 15 16 17 18 19 20 21 22 |
// Week Day Name // Declare data int day = 27; int month = 1; int year = 1991; std::cout << "Day = " << day << ", Month = " << month << ", Year = " << year << std::endl; // Get the weekday name std::string weekdayName = Utils::getWeekdayName(day, month, year); // Display result std::cout << "Weekday Name = " << weekdayName << std::endl; // expected output: /* Day = 27, Month = 1, Year = 1991 Weekday Name = Sunday */ |
3. Utils Namespace
The following is the Utils Namespace. Include this in your project to start using!
|
1 2 3 4 5 6 7 8 9 10 11 12 13 14 15 16 17 18 19 20 21 22 23 24 25 26 27 28 29 30 31 32 33 34 35 36 37 38 39 40 41 42 43 44 45 46 47 48 49 50 51 52 53 54 55 56 57 58 59 60 61 62 63 64 65 66 67 68 69 70 71 72 73 74 75 76 77 78 |
// ============================================================================ // Author: Kenneth Perkins // Date: Feb 5, 2021 // Taken From: http://programmingnotes.org/ // File: Utils.h // Description: Handles general utility functions // ============================================================================ #pragma once #include <string> #include <cmath> namespace Utils { // Specifies the day of the week enum DayOfWeek { Sunday = 0, Monday = 1, Tuesday = 2, Wednesday = 3, Thursday = 4, Friday = 5, Saturday = 6 }; /** * FUNCTION: getWeekday * USE: Returns the day of week for the given parameters * @param day: The day * @param month: The month * @param year: The year * @return: The day of week for the given parameters * 0 = Sunday, 1 = Monday, 2 = Tuesday, ... 6 = Saturday */ DayOfWeek getWeekday(int day, int month, int year) { if (month == 1) { month = 13; --year; } if (month == 2) { month = 14; --year; } int q = day; int m = month; int k = year % 100; int j = static_cast<int>(std::floor(year / 100)); int h = static_cast<int>( q + (std::floor((13 * (m + 1)) / 5)) + k + (std::floor(k / 4)) + (std::floor(j / 4)) + (5 * j) ); h = ((h + 6) % 7); return static_cast<DayOfWeek>(h); } /** * FUNCTION: getWeekdayName * USE: Returns the name of the day of week for the given weekday * @param weekday: The day of the week * @return: The name of the day of week for the given weekday */ std::string getWeekdayName(DayOfWeek weekday) { std::string days[] = { "Sunday", "Monday", "Tuesday", "Wednesday", "Thursday", "Friday", "Saturday" }; return days[weekday]; } /** * FUNCTION: getWeekdayName * USE: Returns the name of the day of week for the given parameters * @param day: The day * @param month: The month * @param year: The year * @return: The name of the day of week for the given parameters */ std::string getWeekdayName(int day, int month, int year) { return getWeekdayName(getWeekday(day, month, year)); } }// http://programmingnotes.org/ |
4. More Examples
Below are more examples demonstrating the use of the ‘Utils‘ Namespace. Don’t forget to include the module when running the examples!
|
1 2 3 4 5 6 7 8 9 10 11 12 13 14 15 16 17 18 19 20 21 22 23 24 25 26 27 28 29 30 31 32 33 34 35 36 37 38 39 40 41 42 43 44 45 |
// ============================================================================ // Author: Kenneth Perkins // Date: Feb 5, 2021 // Taken From: http://programmingnotes.org/ // File: program.cpp // Description: The following demonstrates the use of the Utils Namespace // ============================================================================ #include <iostream> #include <string> #include <exception> #include "Utils.h" void display(const std::string& message); int main() { try { // Declare data int day = 27; int month = 1; int year = 1991; display("Day = " + std::to_string(day) + ", Month = " + std::to_string(month) + ", Year = " + std::to_string(year)); // Get the weekday auto weekday = Utils::getWeekday(day, month, year); display("Weekday = " + std::to_string(weekday)); // Get the weekday name std::string weekdayName = Utils::getWeekdayName(day, month, year); display("Weekday Name = " + weekdayName); } catch (std::exception& e) { display("\nAn error occurred: " + std::string(e.what())); } std::cin.get(); return 0; } void display(const std::string& message) { std::cout << message << std::endl; }// http://programmingnotes.org/ |
QUICK NOTES:
The highlighted lines are sections of interest to look out for.
The code is heavily commented, so no further insight is necessary. If you have any questions, feel free to leave a comment below.
C++ || Simple Multi Digit, Decimal & Negative Number Infix To Postfix Conversion & Evaluation
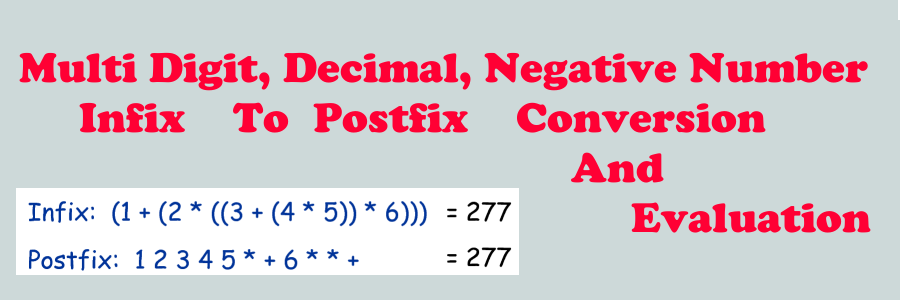
The following is sample code which demonstrates the implementation of a multi digit, decimal, and negative number infix to postfix converter and evaluator using C++.
The program demonstrated on this page has the ability to convert and evaluate a single digit, multi digit, decimal number, and/or negative number infix equation. So for example, if the the infix equation of (19.87 * -2) was entered into the program, the converted postfix expression of 19.87 -2 * would display to the screen, as well as the final evaluated answer of -39.74.
REQUIRED KNOWLEDGE FOR THIS PROGRAM
How To Convert Infix To Postfix

How To Evaluate A Postfix Expression
1. Overview
The program demonstrated on this page is different from a previous implementation of the same type in that this version does not use a Finite State Machine during the conversion process, which simplifies the implemetation!
This program has the following flow of control:
• Get an infix expression from the user

• Convert the infix expression to postfix & isolate all of the math operators, multi digit, decimal, negative and single digit numbers that are found in the postfix expression

• Evaluate the postfix expression by breaking the infix string into tokens found from the above step

• Display the evaluated answer to the screen
The above steps are implemented below.
2. Infix To Posfix Conversion & Evaluation
|
1 2 3 4 5 6 7 8 9 10 11 12 13 14 15 16 17 18 19 20 21 22 23 24 25 26 27 28 29 30 31 32 33 34 35 36 37 38 39 40 41 42 43 44 45 46 47 48 49 50 51 52 53 54 55 56 57 58 59 60 61 62 63 64 65 66 67 68 69 70 71 72 73 74 75 76 77 78 79 80 81 82 83 84 85 86 87 88 89 90 91 92 93 94 95 96 97 98 99 100 101 102 103 104 105 106 107 108 109 110 111 112 113 114 115 116 117 118 119 120 121 122 123 124 125 126 127 128 129 130 131 132 133 134 135 136 137 138 139 140 141 142 143 144 145 146 147 148 149 150 151 152 153 154 155 156 157 158 159 160 161 162 163 164 165 166 167 168 169 170 171 172 173 174 175 176 177 178 179 180 181 182 183 184 185 186 187 188 189 190 191 192 193 194 195 196 197 198 199 200 201 202 203 204 205 206 207 208 209 210 211 212 213 214 215 216 217 218 219 220 221 222 223 224 225 226 227 228 229 230 231 232 233 234 235 236 237 238 239 240 241 242 243 244 245 246 247 248 249 250 251 252 253 254 255 256 257 258 259 260 261 262 263 264 265 266 267 268 269 270 271 272 273 274 275 276 277 278 279 280 281 282 283 284 285 286 287 288 289 290 291 292 293 294 295 296 297 298 299 300 301 302 303 304 305 306 307 308 309 310 311 312 313 314 315 316 317 318 319 320 321 322 323 324 325 326 327 328 329 330 331 332 333 334 335 336 337 338 339 340 341 342 343 344 345 346 347 348 349 350 351 352 353 354 355 356 357 358 359 360 361 362 363 364 365 366 367 368 369 370 371 372 373 374 375 376 377 378 379 380 381 382 383 384 385 386 387 388 389 390 391 392 |
// ============================================================================ // Author: Kenneth Perkins // Date: Jan 31, 2014 // Updated: Feb 5, 2021 // Taken From: http://programmingnotes.org/ // File: InToPostEval.cpp // Description: The following demonstrates the implementation of an infix to // postfix converter and evaluator. This program has the ability to // convert and evaluate multi digit, decimal, negative and positive values // ============================================================================ #include <iostream> #include <cstdlib> #include <cmath> #include <cctype> #include <string> #include <vector> #include <stack> #include <algorithm> #include <exception> #include <stdexcept> // function prototypes void displayDirections(); std::string convertInfixToPostfix(std::string infix); bool isMathOperator(char token); int orderOfOperations(char token); double evaluatePostfix(const std::string& postfix); double calculate(char mathOperator, double value1, double value2); bool isNumeric(char value); bool isNumeric(std::string value); std::vector<std::string> split(const std::string& source, const std::string& delimiters = " "); std::string replaceAll(const std::string& source , const std::string& oldValue, const std::string& newValue); int main() { // declare variables std::string infix = ""; // display directions to user displayDirections(); try { // get data from user std::cout << "\nPlease enter an Infix expression: "; std::getline(std::cin, infix); // convert infix to postfix std::string postfix = convertInfixToPostfix(infix); std::cout << "\nThe Infix expression = " << infix; std::cout << "\nThe Postfix expression = " << postfix << std::endl; // evaluate the postfix string double answer = evaluatePostfix(postfix); std::cout << "\nFinal answer = " << answer << std::endl; } catch (std::exception& e) { std::cout << "\nAn error occurred: " + std::string(e.what()) << std::endl; } std::cin.get(); return 0; }// end of main void displayDirections() { // this function displays instructions to the screen std::cout << "\n==== Infix To Postfix Conversion & Evaluation ====\n" << "\nMath Operators:\n" << "+ || Addition\n" << "- || Subtraction\n" << "* || Multiplication\n" << "/ || Division\n" << "% || Modulus\n" << "^ || Power\n" << "$ || Square Root\n" << "s || Sine\n" << "c || Cosine\n" << "t || Tangent\n" << "- || Negative Number\n" << "Sample Infix Equation: ((s(-4^5)*1.4)/($(23+2)--2.8))*(c(1%2)/(7.28*.1987)^(t23))\n"; // ((sin(-4^5)*1.4)/(sqrt(23+2)--2.8))*(cos(1%2)/(7.28*.1987)^(tan(23))) }// end of displayDirections std::string convertInfixToPostfix(std::string infix) { // this function converts an infix expression to postfix // declare function variables std::string postfix; std::stack<char> charStack; // remove all whitespace from the string infix.erase(std::remove_if(infix.begin(), infix.end(), [](char c) { return std::isspace(static_cast<unsigned char>(c)); }), infix.end()); // negate equations marked with '--' infix = replaceAll(infix, "(--", "("); // automatically convert negative numbers to have the ~ symbol. // this is done so we can distinguish negative numbers and the subtraction symbol for (unsigned x = 0; x < infix.length(); ++x) { if (infix[x] != '-') { continue; } if (x == 0 || infix[x - 1] == '(' || isMathOperator(infix[x - 1])) { infix[x] = '~'; } } // loop thru array until there is no more data for (unsigned x = 0; x < infix.length(); ++x) { // place numbers (standard, decimal, & negative) // numbers onto the 'postfix' string if (isNumeric(infix[x])) { if (postfix.length() > 0 && !isNumeric(postfix.back())) { if (!std::isspace(postfix.back())) { postfix += " "; } } postfix += infix[x]; } else if (std::isspace(infix[x])) { continue; } else if (isMathOperator(infix[x])) { if (postfix.length() > 0 && !std::isspace(postfix.back())) { postfix += " "; } // use the 'orderOfOperations' function to check equality // of the math operator at the top of the stack compared to // the current math operator in the infix string while ((!charStack.empty()) && (orderOfOperations(charStack.top()) >= orderOfOperations(infix[x]))) { // place the math operator from the top of the // stack onto the postfix string and continue the // process until complete if (postfix.length() > 0 && !std::isspace(postfix.back())) { postfix += " "; } postfix += charStack.top(); charStack.pop(); } // push the remaining math operator onto the stack charStack.push(infix[x]); } // push outer parentheses onto stack else if (infix[x] == '(') { charStack.push(infix[x]); } else if (infix[x] == ')') { // pop the current math operator from the stack while ((!charStack.empty()) && (charStack.top() != '(')) { if (postfix.length() > 0 && !std::isspace(postfix.back())) { postfix += " "; } // place the math operator onto the postfix string postfix += charStack.top(); // pop the next operator from the stack and // continue the process until complete charStack.pop(); } // pop '(' symbol off the stack if (!charStack.empty()) { charStack.pop(); } else { // no matching '(' throw std::invalid_argument{ "PARENTHESES MISMATCH" }; } } else { throw std::invalid_argument{ "INVALID INPUT" }; } } // place any remaining math operators from the stack onto // the postfix array while (!charStack.empty()) { if (charStack.top() == '(' || charStack.top() == ')') { throw std::invalid_argument{ "PARENTHESES MISMATCH" }; } if (postfix.length() > 0 && !std::isspace(postfix.back())) { postfix += " "; } postfix += charStack.top(); charStack.pop(); } // replace all '~' symbols with a minus sign postfix = replaceAll(postfix, "~", "-"); return postfix; }// end of convertInfixToPostfix bool isMathOperator(char token) { // this function checks if operand is a math operator switch (std::tolower(token)) { case '+': case '-': case '*': case '/': case '%': case '^': case '$': case 'c': case 's': case 't': return true; break; default: return false; break; } }// end of isMathOperator int orderOfOperations(char token) { // this function returns the priority of each math operator int priority = 0; switch (std::tolower(token)) { case 'c': case 's': case 't': priority = 5; break; case '^': case '$': priority = 4; break; case '*': case '/': case '%': priority = 3; break; case '-': priority = 2; break; case '+': priority = 1; break; } return priority; }// end of orderOfOperations double evaluatePostfix(const std::string& postfix) { // this function evaluates a postfix expression // declare function variables double answer = 0; std::stack<double> doubleStack; // split string into tokens to isolate multi digit, negative and decimal // numbers, aswell as single digit numbers and math operators auto tokens = split(postfix); // display the found tokens to the screen //for (unsigned x = 0; x < tokens.size(); ++x) { // std::cout<< tokens.at(x) << std::endl; //} std::cout << "\nCalculations:\n"; // loop thru array until there is no more data for (unsigned x = 0; x < tokens.size(); ++x) { auto token = tokens[x]; // push numbers & negative numbers onto the stack if (isNumeric(token)) { doubleStack.push(std::atof(token.c_str())); } // if expression is a math operator, pop numbers from stack // & send the popped numbers to the 'calculate' function else if (isMathOperator(token[0]) && (!doubleStack.empty())) { double value1 = 0; double value2 = 0; char mathOperator = static_cast<unsigned char>(std::tolower(token[0])); // if expression is square root, sin, cos, // or tan operation only pop stack once if (mathOperator == '$' || mathOperator == 's' || mathOperator == 'c' || mathOperator == 't') { value2 = 0; value1 = doubleStack.top(); doubleStack.pop(); answer = calculate(mathOperator, value1, value2); doubleStack.push(answer); } else if (doubleStack.size() > 1) { value2 = doubleStack.top(); doubleStack.pop(); value1 = doubleStack.top(); doubleStack.pop(); answer = calculate(mathOperator, value1, value2); doubleStack.push(answer); } } else { // this should never execute, & if it does, something went really wrong throw std::invalid_argument{ "INVALID POSTFIX STRING" }; } } // pop the final answer from the stack, and return to main if (!doubleStack.empty()) { answer = doubleStack.top(); } return answer; }// end of evaluatePostfix double calculate(char mathOperator, double value1, double value2) { // this function carries out the actual math process double ans = 0; switch (std::tolower(mathOperator)) { case '+': std::cout << value1 << mathOperator << value2; ans = value1 + value2; break; case '-': std::cout << value1 << mathOperator << value2; ans = value1 - value2; break; case '*': std::cout << value1 << mathOperator << value2; ans = value1 * value2; break; case '/': std::cout << value1 << mathOperator << value2; ans = value1 / value2; break; case '%': std::cout << value1 << mathOperator << value2; ans = ((int)value1 % (int)value2) + std::modf(value1, &value2); break; case '^': std::cout << value1 << mathOperator << value2; ans = std::pow(value1, value2); break; case '$': std::cout << char(251) << value1; ans = std::sqrt(value1); break; case 'c': std::cout << "cos(" << value1 << ")"; ans = std::cos(value1); break; case 's': std::cout << "sin(" << value1 << ")"; ans = std::sin(value1); break; case 't': std::cout << "tan(" << value1 << ")"; ans = std::tan(value1); break; default: ans = 0; break; } std::cout << " = " << ans << std::endl; return ans; }// end of calculate std::vector<std::string> split(const std::string& source, const std::string& delimiters) { std::size_t prev = 0; std::size_t currentPos = 0; std::vector<std::string> results; while ((currentPos = source.find_first_of(delimiters, prev)) != std::string::npos) { if (currentPos > prev) { results.push_back(source.substr(prev, currentPos - prev)); } prev = currentPos + 1; } if (prev < source.length()) { results.push_back(source.substr(prev, std::string::npos)); } return results; }// end of split std::string replaceAll(const std::string& source , const std::string& oldValue, const std::string& newValue) { if (oldValue.empty()) { return source; } std::string newString; newString.reserve(source.length()); std::size_t lastPos = 0; std::size_t findPos; while (std::string::npos != (findPos = source.find(oldValue, lastPos))) { newString.append(source, lastPos, findPos - lastPos); newString += newValue; lastPos = findPos + oldValue.length(); } newString += source.substr(lastPos); return newString; }// end of replaceAll bool isNumeric(char value) { return std::isdigit(value) || value == '.' || value == '~'; }// end of isNumeric bool isNumeric(std::string value) { for (unsigned index = 0; index < value.length(); ++index) { if (index == 0 && value[index] == '-' && value.length() > 1) { continue; } if (!isNumeric(value[index])) { return false; } } return true; }// http://programmingnotes.org/ |
QUICK NOTES:
The highlighted lines are sections of interest to look out for.
The code is heavily commented, so no further insight is necessary. If you have any questions, feel free to leave a comment below.
The following is sample output.
====== RUN 1 ======
==== Infix To Postfix Conversion & Evaluation ====
Math Operators:
+ || Addition
- || Subtraction
* || Multiplication
/ || Division
% || Modulus
^ || Power
$ || Square Root
s || Sine
c || Cosine
t || Tangent
- || Negative Number
Sample Infix Equation: ((s(-4^5)*1.4)/($(23+2)--2.8))*(c(1%2)/(7.28*.1987)^(t23))Please enter an Infix expression: 12/3*9
The Infix expression = 12/3*9
The Postfix expression = 12 3 / 9 *Calculations:
12/3 = 4
4*9 = 36Final answer = 36
====== RUN 2 ======
==== Infix To Postfix Conversion & Evaluation ====
Math Operators:
+ || Addition
- || Subtraction
* || Multiplication
/ || Division
% || Modulus
^ || Power
$ || Square Root
s || Sine
c || Cosine
t || Tangent
- || Negative Number
Sample Infix Equation: ((s(-4^5)*1.4)/($(23+2)--2.8))*(c(1%2)/(7.28*.1987)^(t23))Please enter an Infix expression: -150.89996 - 87.56643
The Infix expression = -150.89996 - 87.56643
The Postfix expression = -150.89996 87.56643 -Calculations:
-150.9-87.5664 = -238.466Final answer = -238.466
====== RUN 3 ======
==== Infix To Postfix Conversion & Evaluation ====
Math Operators:
+ || Addition
- || Subtraction
* || Multiplication
/ || Division
% || Modulus
^ || Power
$ || Square Root
s || Sine
c || Cosine
t || Tangent
- || Negative Number
Sample Infix Equation: ((s(-4^5)*1.4)/($(23+2)--2.8))*(c(1%2)/(7.28*.1987)^(t23))Please enter an Infix expression: ((s(-4^5)*1.4)/($(23+2)--2.8))*(c(1%2)/(7.28*.1987)^(t23))
The Infix expression = ((s(-4^5)*1.4)/($(23+2)--2.8))*(c(1%2)/(7.28*.1987)^(t23))
The Postfix expression = -4 5 ^ s 1.4 * 23 2 + $ -2.8 - / 1 2 % c 7.28 .1987 * 23 t ^ / *Calculations:
-4^5 = -1024
sin(-1024) = 0.158533
0.158533*1.4 = 0.221947
23+2 = 25
√25 = 5
5--2.8 = 7.8
0.221947/7.8 = 0.0284547
1%2 = 1
cos(1) = 0.540302
7.28*0.1987 = 1.44654
tan(23) = 1.58815
1.44654^1.58815 = 1.79733
0.540302/1.79733 = 0.300614
0.0284547*0.300614 = 0.00855389Final answer = 0.00855389
====== RUN 4 ======
==== Infix To Postfix Conversion & Evaluation ====
Math Operators:
+ || Addition
- || Subtraction
* || Multiplication
/ || Division
% || Modulus
^ || Power
$ || Square Root
s || Sine
c || Cosine
t || Tangent
- || Negative Number
Sample Infix Equation: ((s(-4^5)*1.4)/($(23+2)--2.8))*(c(1%2)/(7.28*.1987)^(t23))Please enter an Infix expression: (1987 + 1991) * -1
The Infix expression = (1987 + 1991) * -1
The Postfix expression = 1987 1991 + -1 *Calculations:
1987+1991 = 3978
3978*-1 = -3978Final answer = -3978
====== RUN 5 ======
==== Infix To Postfix Conversion & Evaluation ====
Math Operators:
+ || Addition
- || Subtraction
* || Multiplication
/ || Division
% || Modulus
^ || Power
$ || Square Root
s || Sine
c || Cosine
t || Tangent
- || Negative Number
Sample Infix Equation: ((s(-4^5)*1.4)/($(23+2)--2.8))*(c(1%2)/(7.28*.1987)^(t23))Please enter an Infix expression: (1+(2*((3+(4*5))*6)))
The Infix expression = (1+(2*((3+(4*5))*6)))
The Postfix expression = 1 2 3 4 5 * + 6 * * +Calculations:
4*5 = 20
3+20 = 23
23*6 = 138
2*138 = 276
1+276 = 277Final answer = 277
C++ || Circular Array – How To Index Into Array As If It Is Circular Using C++
The following is a module with functions which demonstrates how to index into an array as if it is circular using C++.
This function adjusts a range as circular and ‘wraps around’ the value to become in bounds.
1. Circular Array
The example below demonstrates the use of ‘Utils::circularWrap‘ to index into a vector as if it is circular and adjusts a range as circular so the value become in bounds.
Note: A vector is used in this example, but it is not required.
|
1 2 3 4 5 6 7 8 9 10 11 12 13 14 15 16 17 18 19 20 21 22 23 24 25 26 27 28 29 30 31 32 33 34 35 36 37 38 |
// Circular Array // Declare words std::vector<std::string> words = { "Kenneth", "Jennifer", "Lynn", "Sole" }; // Display words for (int index = -9; index <= 10; ++index) { // Wrap index to be in bounds auto adjusted = Utils::circularWrap(index, words.size()); // Display results std::cout << "Index: " << index << ", Adjusted Index: " << adjusted << ", Word: " << words[adjusted] << std::endl; } // expected output: /* Index: -9, Adjusted Index: 3, Word: Sole Index: -8, Adjusted Index: 0, Word: Kenneth Index: -7, Adjusted Index: 1, Word: Jennifer Index: -6, Adjusted Index: 2, Word: Lynn Index: -5, Adjusted Index: 3, Word: Sole Index: -4, Adjusted Index: 0, Word: Kenneth Index: -3, Adjusted Index: 1, Word: Jennifer Index: -2, Adjusted Index: 2, Word: Lynn Index: -1, Adjusted Index: 3, Word: Sole Index: 0, Adjusted Index: 0, Word: Kenneth Index: 1, Adjusted Index: 1, Word: Jennifer Index: 2, Adjusted Index: 2, Word: Lynn Index: 3, Adjusted Index: 3, Word: Sole Index: 4, Adjusted Index: 0, Word: Kenneth Index: 5, Adjusted Index: 1, Word: Jennifer Index: 6, Adjusted Index: 2, Word: Lynn Index: 7, Adjusted Index: 3, Word: Sole Index: 8, Adjusted Index: 0, Word: Kenneth Index: 9, Adjusted Index: 1, Word: Jennifer Index: 10, Adjusted Index: 2, Word: Lynn */ |
2. Utils Namespace
The following is the Utils Namespace. Include this in your project to start using!
|
1 2 3 4 5 6 7 8 9 10 11 12 13 14 15 16 17 18 19 20 21 |
// ============================================================================ // Author: Kenneth Perkins // Date: Jan 27, 2021 // Taken From: http://programmingnotes.org/ // File: Utils.h // Description: Handles general utility functions // ============================================================================ #pragma once namespace Utils { /** * FUNCTION: circularWrap * USE: Adjusts a range as circular and 'wraps around' the value to become in bounds * @param left: The current number, or the 'numerator' * @param right: The upper bound maximum range number, or the 'denominator' * @return: The adjusted value according to the denominator */ int circularWrap(int left, int right) { return ((left % right) + right) % right; } }// http://programmingnotes.org/ |
3. More Examples
Below are more examples demonstrating the use of the ‘Utils‘ Namespace. Don’t forget to include the module when running the examples!
|
1 2 3 4 5 6 7 8 9 10 11 12 13 14 15 16 17 18 19 20 21 22 23 24 25 26 27 28 29 30 31 32 33 34 35 36 37 38 39 40 |
// ============================================================================ // Author: Kenneth Perkins // Date: Jan 27, 2021 // Taken From: http://programmingnotes.org/ // File: program.cpp // Description: The following demonstrates the use of the Utils Namespace // ============================================================================ #include <iostream> #include <string> #include <exception> #include <vector> #include "Utils.h" void display(const std::string& message); int main() { try { // Declare words std::vector<std::string> words = { "Kenneth", "Jennifer", "Lynn", "Sole" }; // Display words for (int index = -9; index <= 10; ++index) { // Wrap index to be in bounds auto adjusted = Utils::circularWrap(index, words.size()); // Display results std::cout << "Index: " << index << ", Adjusted Index: " << adjusted << ", Word: " << words[adjusted] << std::endl; } } catch (std::exception& e) { display("\nAn error occurred: " + std::string(e.what())); } std::cin.get(); return 0; } void display(const std::string& message) { std::cout << message << std::endl; }// http://programmingnotes.org/ |
QUICK NOTES:
The highlighted lines are sections of interest to look out for.
The code is heavily commented, so no further insight is necessary. If you have any questions, feel free to leave a comment below.
C++ || How To Split & Parse A String Into Tokens With Multiple Delimiters Using C++
The following is a module with functions which demonstrates how to split and parse a string into substring tokens with multiple delimiters using C++.
The function demonstrated on this page parses and splits a string and returns a vector that contains the substring tokens according to the delimiters.
The delimiters can be either a single character or multiple characters. If no delimiting characters are specified, the string is split at whitespace characters.
1. Split – Basic Usage
The example below demonstrates the use of ‘Utils::split‘ to split a string into substring tokens.
In this example, the default delimiter is used to split a string, which is a whitespace.
|
1 2 3 4 5 6 7 8 9 10 11 12 13 14 15 16 17 18 19 20 |
// Split - Basic Usage // Declare data std::string input = "Kenneth Jennifer Lynn Sole"; // Get string split results auto results = Utils::split(input); // Display results for (const auto& substring : results) { std::cout << "Substring: " << substring << std::endl; } // expected output: /* Substring: Kenneth Substring: Jennifer Substring: Lynn Substring: Sole */ |
2. Split – Multiple Delimiters
The example below demonstrates the use of ‘Utils::split‘ to split a string into substring tokens.
In this example, multiple delimiters are used to split a string.
|
1 2 3 4 5 6 7 8 9 10 11 12 13 14 15 16 17 18 19 20 21 22 23 24 25 26 27 28 29 30 31 |
// Split - Multiple Delimiters // Declare data std::string input = "- This, is. a sample string? 3!30$' 19: 68/, LF+, 1, 1"; // Declare delimiters std::string delimeters = " ,.-':;?()+*/%$#!\"@^&"; // Get string split results auto results = Utils::split(input, delimeters); // Display results for (const auto& substring : results) { std::cout << "Substring: " << substring << std::endl; } // expected output: /* Substring: This Substring: is Substring: a Substring: sample Substring: string Substring: 3 Substring: 30 Substring: 19 Substring: 68 Substring: LF Substring: 1 Substring: 1 */ |
3. Utils Namespace
The following is the Utils Namespace. Include this in your project to start using!
|
1 2 3 4 5 6 7 8 9 10 11 12 13 14 15 16 17 18 19 20 21 22 23 24 25 26 27 28 29 30 31 32 33 34 35 36 |
// ============================================================================ // Author: Kenneth Perkins // Date: Jan 23, 2021 // Taken From: http://programmingnotes.org/ // File: Utils.h // Description: Handles general utility functions // ============================================================================ #pragma once #include <vector> #include <string> namespace Utils { /** * FUNCTION: split * USE: Splits a string into tokens and saves them into a vector * @param source: String to be broken up into substrings (tokens) * @param delimiters: String containing the delimiter character(s) * @return: A vector containing all the found tokens in the string */ std::vector<std::string> split(const std::string& source, const std::string& delimiters = " ") { std::size_t prev = 0; std::size_t currentPos = 0; std::vector<std::string> results; while ((currentPos = source.find_first_of(delimiters, prev)) != std::string::npos) { if (currentPos > prev) { results.push_back(source.substr(prev, currentPos - prev)); } prev = currentPos + 1; } if (prev < source.length()) { results.push_back(source.substr(prev)); } return results; } }// http://programmingnotes.org/ |
4. More Examples
Below are more examples demonstrating the use of the ‘Utils‘ Namespace. Don’t forget to include the module when running the examples!
|
1 2 3 4 5 6 7 8 9 10 11 12 13 14 15 16 17 18 19 20 21 22 23 24 25 26 27 28 29 30 31 32 33 34 35 36 37 38 39 40 41 42 43 44 45 46 47 48 49 50 51 52 53 54 |
// ============================================================================ // Author: Kenneth Perkins // Date: Jan 23, 2021 // Taken From: http://programmingnotes.org/ // File: program.cpp // Description: The following demonstrates the use of the Utils Namespace // ============================================================================ #include <iostream> #include <string> #include <exception> #include <vector> #include "Utils.h" void display(const std::string& message); int main() { try { // Declare data std::string input = "Kenneth Jennifer Lynn Sole"; // Get string split results auto results = Utils::split(input); // Display results for (const auto& substring : results) { display("Substring: " + substring); } display(""); // Declare data std::string input2 = "- This, is. a sample string? 3!30$' 19: 68/, LF+, 1, 1"; // Declare delimiters std::string delimeters = " ,.-':;?()+*/%$#!\"@^&"; // Get string split results auto results2 = Utils::split(input2, delimeters); // Display results for (const auto& substring : results2) { display("Substring: " + substring); } } catch (std::exception& e) { display("\nAn error occurred: " + std::string(e.what())); } std::cin.get(); return 0; } void display(const std::string& message) { std::cout << message << std::endl; }// http://programmingnotes.org/ |
QUICK NOTES:
The highlighted lines are sections of interest to look out for.
The code is heavily commented, so no further insight is necessary. If you have any questions, feel free to leave a comment below.


